Sunday, December 22, 2013

Shhh... Go ahead. You throttle that CPU.

Lately I got sucked into looking at methods to throttle CPUs on PowerPC. It started out as a good idea, but my compulsion for completeness made it take on a life of its own and I probably spent way more time reading about it than necessary. But I've come out the other side, and now I'm reading a 580 page book about the Crimean War! Totally useful knowledge. I know how to pick 'em. Anyway, the point of all this is I am now here to share the fruits of my labor and tell you exactly why Orthodox religion and rampant Russophobia in Western Europe led to... I mean, tell you all the ways you can throttle your Mac's CPU.

Throttling CPUs often gets confused with the nice/renice commands, but they aren't quite the same. Nice/renice only prioritizes processes eating your CPU, but all your idle CPU will still be used. CPU throttling actually limits the amount of CPU a process can use. For example, if you throttle Handbrake to 50% CPU, Handbrake won't rise above 50% usage even if there are no other processes running. The practical use for this is mostly for laptops. Let's say you're doing some compiling or video encoding, something CPU intensive that takes a long time, but your laptop easily overheats or you just don't want to hear the fan going. You can limit the heat by throttling the CPU. Sure, it'll take longer, but your laptop won't give you Toasted Skin Syndrome.

For our PowerPC Macs I found a few ways of doing this, all from the command line. First, on Linux there's a program called cpulimit which has you enter a process name or PID number and the percentage of maximum CPU you want to set it to. A typical command would look like this:

cpulimit -e iceweasel -l 50

The "-e" is used when you enter the name of the program (iceweasel). You use "-p" when entering the PID instead, and you can also use -P to enter the absolute path (/usr/bin/iceweasel). The "-l" is for limit, and the 50 is the max percentage of CPU allowed. To exit, just use the standard ctrl-C.

For OS X, I found a couple of ways that work in Tiger. First, there's cpulimitrob. This is a script that someone left on Mac OS X Hints and does essentially what cpulimit does. It uses SIGSTOP and SIGCONT to pause and restart, thereby limiting total CPU time. After you download it and give it the customary chmod kiss (755), you change directories to its current location with the cd command and fire it up as root:

~ dan$ cd Development

~/Development dan$ sudo ./cpulimitrob.sh
Password:
Which process ID (PID)?
297
Sleep time in seconds?
.5
Run time in seconds (e.g 0.5 or 1 ?)?
.5
.................


and the dots continue on and on until you exit with ctrl-C. It mostly works well. The only hitch I found was when testing with TenFourFox, where the browser froze whenever I exited cpulimitrob in the middle of a page loading.

The other tool I found for Tiger didn't have any such problems and appears to exit more gracefully. It's called cputhrottle. However, the binary available for download isn't compiled for PowerPC, and to compile requires Boost 1.33.1. So being the completist that I am, I installed Boost with Tigerbrew (about 3-4 hours to configure and make) and then compiled cputhrottle from source. Using cputhrottle is almost the same as cpulimit, though like cpulimitrob, you need to run it with the sudo command:

~ dan$ cd Development/cputhrottle

~/Development/cputhrottle dan$ sudo ./cputhrottle 1309 50


The 1309 is the PID which you can get from top or Activity Monitor, and the 50 is the max CPU percentage. And again, killing the limit is as simple as ctrl-C.

In case you don't want to compile Boost and cputhrottle, I uploaded the binary I made to my Mediafire folder. It should work on Tiger, though I'm not enough of a compiling expert to say definitively whether it'll work on Leopard. You may also need to run "chmod +x cputhrottle" to make it executable.

Finally, if you just want to prioritize your processes so web browsing or somesuch isn't super slow while something else hogs the CPU, you don't have to use nice/renice from the command line. There's a very old GUI application for OS X called ProcessWizard that still works. In Linux, you can do the same with Gnome System Monitor.

Sunday, December 8, 2013

Let's Play...

...let's link to other people's PowerPC Youtube channels! These are (more or less) PowerPC centric, though I don't vouch for the quality of each and every vid.

The iBookGuy - Not just iBooks!

The PowerPC Hub - Actually a mix of MacIntel, iOS and PowerPC.

Lmull3's Geekery Emporium - Macs and Mac clones.

ItsMyNaturalColour - The dude with the white hair.

BBISHOPPCM's World - Some really old vintage stuff.

gavinstubbs09 - A few PowerPC videos here.

Tuesday, December 3, 2013

My Stupid Mac Youtube Channel

So I went and made my own Youtube channel. I intend to populate it with mostly videos of old Mac games, at least the ones I liked. I might also throw in a Linux screencast. I've been meaning to do something like that for ages, so at my current pace I'll get around to it sometime in the next calendar year (don't hold me to it). Also, it looks like Youtube implemented their new comment policy just in time, so all of you who want to call me a booger snot will have to do it from your public Google+ profile :-P

Incidentally, did you know MPEG Steamclip is still around? I needed to edit some of these videos, which were .mov files with an odd audio codec, and Avidemux wouldn't play along. So I remembered MPEG Streamclip which I used a long time ago and went over to their site and saw they had an update from last year. Still runs on Jaguar (!). It's still as easy as ever to use and did exactly what I needed.

One last tidbit, if you upload a 640x480 video to Youtube in H.264 format, it will be horribly distorted when Youtube downscales it to 360p. If you upload as MPEG-4, you won't have that problem.

Sunday, November 24, 2013

Airdrop and Launchpad Clones for your Tiger and Leopard Desktop

Over the last few itinerations of OS X, Apple has included several new features that would seem to leave PowerPC users in the dust, but if you go looking you can definitely find alternatives that can get things done in much the same way. The two features I'm focusing on today are Airdrop and Launchpad.

Airdrop is a much-ballyhooed super simple way to share files with other Macs that are also Airdrop-capable. You basically just drag and drop what you want to transfer into a special Airdrop folder inside the Finder. Launchpad is a new application launcher that displays all your app icons onscreen in a way similar to Gnome 3 and Unity, but Apple would never steal from those basket cases, right?

It turns out Airdrop isn't so new after all, at least to those who have been using DropCopy. DropCopy is very similar in that it places a small transparent circle on your desktop, and you simply drag and drop what you want to send to another Mac that's on your LAN and running DropCopy as well. The newest version supports Intel only, but an older version is available for Tiger and Leopard. A mobile app is available, too. DropCopy also lets you transfer files long distance if you know the public IP address of the Mac you're sending to.

Bevy on Tiger

Launchpad's doppelgänger is called Bevy (above), and it too throws all your application icons in front of you, only in this instance they're organized by folder (Applications, Utilities, and Developer, etc.). A lot of people seem to be annoyed with Launchapd, or at least ignore it, but having a visual representation of all your applications is sometimes useful, and Bevy offers a good alternative to do that. It's nagware, but it's only $9.95.

Now if we could only get Mavericks' dual monitor support, we could...Oh, wait. Dual monitor support was originally effed up in Lion, so we don't need that fix. Glad to see Apple's finally catching up to the Tiger era.

Monday, November 18, 2013

Putting the Christmas Spirit on your Mac Desktop

It's about that time of year again. Time to buy buy buy, and hope you better get something out of your investment at least in the form of a carton of cigarettes or something useful. Too cynical? Right. There's what we say we want for Christmas and what we really want. Anyway, in case that sounds too transactional for your delicate sensibilities, here are a few ways you can put the spirit and cheer and decoratáge of Christmas onto your OS X desktops.

Nothing says Christmas like Christmas lights, so to get those on your desktop you can get MacLampsX. It works on Tiger PowerPC on up, and you can also check their page of custom bulbs to download if you want to add to the default.

Falling animated snow is also doable, with Snö. It can use a lot of CPU, so you'll probably want to dial back from the defaults.

And to round it all off, there's a PowerPC screen saver conveniently called SnowSaver. This one doesn't use a ton of CPU, while managing a somewhat impressive 3-D look.

Here's what MacLampsX and Snö look like together on a Tiger desktop. The Badlands wallpaper probably isn't entirely appropriate, but this is America (in my part of the world).


I looked for some of this stuff on Linux, too, and there's something really cool looking called XSnow, but it's not compiled on Debian for PowerPC and I didn't know how to build it. I'll just have to imagine it, like Santa Claus and his lair, or whatever all that business is.

UPDATE: Thanks to Charles in the comments for pointing out X-MasTree, a blinking light Christmas tree for you desktop (also features a days till Xmas badge). The only download left on the internet seems to be on this Tucows ftp archive. Direct download is here.

Sunday, November 10, 2013

Ladies and Gentlemen, Your iTunes Killer

As long time readers may know, I've been on a never-ending quest to find a music player that I like, or to put it another way, that I don't actively dislike. I mostly stuck it out with iTunes over the years, having found the alternatives lacking. This hasn't been a problem in Linux where there's much more choice, including the excellent Audacious, but in OS X things are a bit more constricted.

I did switch to Cog more recently, and I think I wrote about it, too. The deal breaker previously was its lack of an equalizer, but since I found how to enact a global equalizer, I switched. Still, though, Cog didn't support radio streaming and I had to rely on Mplayer from the command line or go back to iTunes for that feature.

Was this the end of the road? Was I to be forever denied local playback and internet streaming in one appealing package? Would I ever find audio nirvana?

Well, I have found my nirvana and it is called CMus.

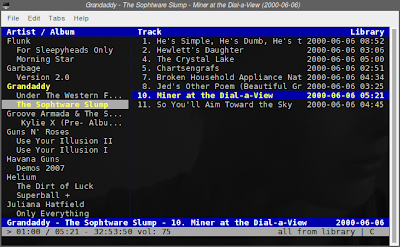
CMus music player

That's right, CMus is a console player. No mouse, just key commands. It plays mp3, ogg vorbis, flac, aac, the works, and also streams internet radio. And for icing on the cake, it's cross platform. On both Linux and OS X, you just use your package manager to install, so if you're on OS X you'd use either Macports or Tigerbrew.

After installing, the easiest way to get started is by pressing 5 for the browser pane and navigating to your Music folder. Press "a" to add the songs to your library and then press 1 to go to your library in tree view (press 2 for your library in list view). Press return to start playing, or use the arrow keys to choose the artist, the spacebar to expand the albums tree, and then tab to switch the active cursor to the album pane.

To add a radio station to your library, type ":" without quotes to activate the command line section, then "add http://..." and press return. It should be the first item in your library, called "<Stream>". Alternately, you can use the browser pane to navigate to any .m3u files on your hard drive and add them with the aforementioned "a".

The resources CMus uses are practically nonexistent. It's also very fast to load libraries and playlists, and speed is the main advantage of console programs such as this. The downside is that they can be hard to master with many key commands to memorize, but music players aren't all that complex when you get down to it. Mostly, you play, stop, pause, skip, and shuffle, etc. After a quick read of the manual, I got the hang of it in about a minute.

I don't think I'll go full-on frugal computing and start using console apps for all my needs, but in case you're inclined to explore that option there are tons of console alternatives to your GUI apps. There's Alpine and Mutt for email, ELinks for web browsing, also Floodgap's more famous software title, TTYtter, as well as LFTP, SLRN, Pianobar, and more. If you use the functionality of any of these often, you should take a look. You might find yourself surprised.

Thursday, October 24, 2013

Changing Color Temperature in Linux

Color calibration has never really been a problem on Macs with built-in monitors like iMacs and 'Books of various sorts. Naturally, since they make both the hardware and software. The picture is bright, and the colors are warm and vibrant. The same can't be said, though, when you introduce anything non-Apple into the mix like a third-party external monitor, or booting into Linux. In those cases, the default color temperature tends to look too blue, too cool.

If you have an external monitor, that isn't a problem as you can just reach up and adjust the color temperature manually on your monitor's controls, but if you're booted into Linux and you're on an iMac or a laptop, you don't have that option. You need a software solution, and as chance has it, there is one. It's called Redshift, and it's a cool little command line utility that was originally intended to adjust the color temperature of your screen according to the time of day, but there's also a "one shot manual mode" that lets you adjust once to a permanent setting.

To change your screen's color temperature, you just need to type one simple command:

redshift -O colortemperature

where colortemperature is a number in Degrees Kelvin (the default seems to be 6500). Also, the -O is capital O, not zero. So if your iMac or laptop screen is too cool, try lowering the temperature number a little, to say 6200, for a slightly warmer picture. On my iBook, I eventually settled on 6250. An easy way to calibrate your screen correctly is to hold up a Macintosh laptop booted into OS X next to it and make them match.

Now put that command in your autostart file or a startup script and you're good to go.

I've written before about Xgamma which I used to adjust the gamma level, and I also tried it for warming up the screen by adjusting the red, blue, and green levels separately, but I could never get it quite...right. So Redshift really comes to the rescue here.

Also monitor related, if you're using an external monitor connected to your laptop, I discovered a simple GUI front end for xrandr called LXRandr.


So if you were trying to deal with xrandr from the command line to put your laptop display to sleep and set the resolution for your external monitor, this significantly simplifies things.

Saturday, October 19, 2013

Taking TenFourFox 24 Beta Out for a Test Drive

I've been looking forward to TenFourFox 24 with a bit of trepidation. I'd gotten used to TenFourFox 17's safe, it-just-works confines, but all ESRs must come to an end and 17's time is almost up. It's time for 24 to be the new stable release, but if you've followed the TenFourFox Development blog, you'd know the road toward 24 has been a somewhat torturous one. Cameron Kaiser has been leaving hints and intimations that the new javascript interpreter necessitated by Mozilla's switch to IonMonkey might mean a hit in performance, and after much work he can now report that it's "not an utter disaster." I've heard worse words.

So how does 24 measure up in the wild? After downloading it, I started the browser and was immediately confronted with a frozen tab bar. I closed the window and brought up a new one and I haven't been able to reproduce the issue. Maybe an Australis gremlin. Anyway, the speed is what I'm here for and to see for myself if there are any regressions. And I can report, in my non-benchmarking way, that the difference is monumentally, horrifyingly...nil. I honestly don't notice any speed difference between 17 and 24, and if anything, the GUI (menus, scrollbars, etc.) feels a bit snappier. So bullet dodged, and with IonMonkey more fully implemented in later releases, it looks like things will only get better.

The only difference I saw was in memory consumption. It was usually in the 300-350 MB range vs. 17's 250-ish range. I don't know if that'll be optimized in the future. But overall I'm happy and I'd say don't hesitate to upgrade when the final is released in December.

Also, a reminder for Leopard users, SeaMonkey-PPC and Leopard-Webkit are still making builds for PowerPC, so give those a shot, too.

Wednesday, October 16, 2013

Own Your Owncloud on PowerPC

Last time I wrote about syncing, it was about syncing files over your home network, but I was also curious about Owncloud, an open source cloud server, for syncing over the web. As luck would have it, a couple of links came my way from Owncloud's forums about getting it to run on PowerPC. The first link is a post on compiling for Leopard, and the second points out Owncloud is now in the Debian Jessie repositories. So to get it on Wheezy, just change your apt sources.list to download the Jessie packages before changing back.

ownCloud 1.4.0 client PowerPC Leopard version successful

Desktop client for iBook G4 running Debian Wheezy

Once you have everything running, you can sync with your web server or even your home server, and you get some nifty calendar, contacts, and music features, too.

On a semi-related note, I have a cloud server of sorts with my Mediafire account where I keep uploads like Transmission QT 2.31 and other PowerPC related stuff. I bring this up because Peter S. sent me his version of Open Arena specially compiled for G3s (altivec disabled), so I uploaded it and here's the direct link.

Now thanks to Peter you can have a G3 and still get your Quake 3 game on.

Thursday, October 3, 2013

Odds & Ends: Emails, Links, and Screenshots

I've gotten a few emails recently that I thought I'd share with you. First off, Michael C. points out his new Quadras, Cubes and G5s blog. It's a WordPress blog, so it looks much nicer than mine :) Also, he's been rummaging around the University of Michigan Software Archive and found something I've always been curious about--a CPU meter for OS 9. So go over there and check out the full story!

Reader Gaël E. informs me of a handy tool to create applications that run from OS X's menubar. It's called Tapir, and it also has a sequel called Platypus. Check out Tapir's screenshot page to see what it can do with the "df -h" command. There are many many more possibilities.

Finally, K.M. sent me a cool screenshot of a GTK-ish app running on Leopard. It's a media collection manager called Griffith that only officially supported Snow Leopard, but with the dependencies listed on their download page, K.M. compiled it and got it running on PowerPC. It's using the DVDEmpire plugin which can be found along with many other updated plugins on this berlios page (many of the plugins that came with the application are now out of date).

Griffith on Leopard PPC

Sunday, September 29, 2013

Sync Files Across Your Macs With Unison

Awhile ago I wrote about Bittorrent Sync, basically your own bittorrent network for syncing your files on your home network. I wrote about it because they included a PowerPC binary with their Linux downloads, but unfortunately their OS X client required Intel so if you wanted to use this on your PowerPC Macs, they all had to be running Linux.

This left me still out to sea. I use a mix of Tiger and Debian machines, so Bittorrent Sync ultimately wasn't for me (it's also closed source and unavailable for security auditing). So having tired of SFTPing my files around and expending brain power to keep all the versions straight, I went looking for another option, one like Bittorrent Sync where I could sync on my home network and without involving the cloud.

At first I looked at rsync, venerable I guess you'd call it, not old :), but that offers mirroring, not two-way syncing. Finally I stumbled upon Unison, an rsync-like utility that's exactly what I need, two-way syncing, and it's multi-platform--Windows, Linux, OS X, everything.

You can get Unison in command line form or as a GUI. The command line can be installed with Macports or Tigerbrew on OS X and is in the Debian repositories. Debian also has the GUI, unison-gtk. Does that leave OS X out of the GUI party? No sirree. Universal binaries for Tiger and Leopard have been made available here, and the thing to note is you need the same version on all computers. Meaning if you install 2.32 on Tiger from the previous link, you also must have 2.32 on every other system you're syncing with. Fortunately Debian makes multiple version available for just this situation, so now I have 2.32-12 on my Tiger laptop and 2.32-52-gtk on my Jessie system (the 12 and 52 don't matter).

Using Unison is as simple or as complex as you want it. You can start by using the GUI app and then graduate to the command line for more complex operations which you can automate with cron jobs. But for now I'll give you a quick rundown of getting started with the GUI.

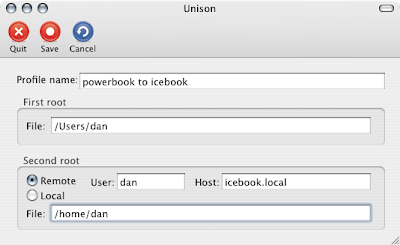
First, it's recommended you copy the folders you want to sync over to your target computer so you start out with identical folders. Then you start up the Unison GUI and create a profile. Here's an example for syncing my Tiger home folder with my Debian home folder on an iBook:

Unison profile on OS X

About the "Remote" part, note this is all done over SSH, so make sure you have Remote Login enabled in your OS X Sharing Preferences or have openssh-server running on Linux. Also note that SSH gives you rock-solid security (unless your password is "password"). For "Host", it could be xxx.xxx.x.xxx or your computer's hostname.

Now save it, but say you don't want to sync everything in your home folder. What if you only want Documents, Music, and Pictures synced? You could create a separate profile for each folder or mess around with symlinks, but a much better way is to edit your .prf file to define those paths. In OS X you'll find it in ~/Library/Application Support/Unison, and in Linux it's in ~/.unison. Here's a simple example of my "powerbook to icebook.prf":

# Unison preferences file
root = /Users/dan
root = ssh://dan@icebook.local//home/dan

# folders to sync
path = Documents
path = Music
path = Pictures

# filenames to ignore
ignore = Name .DS_Store
ignore = Name .localized

# save log file somewhere, anywhere but the home
# folder
logfile = /Users/dan/Library/Logs/unison.log


The first three lines were created when we saved the profile in the GUI, but the rest were added. In the second section, I define the paths of the specific folders I want synced (you don't have to write out the full path as the root is already defined in the first section), the third section tells Unison to ignore those hidden .DS_Store and .localized files in OS X, and the last section tells it where to save the log file (the default is your home folder).

The only trouble I had was with spaces in the folder names. Say if I wanted to enter "path = Pictures/vacation photos" it won't work. Adding \ or enclosing with quotes didn't work, either, so the only solution I can think of is to eliminate the spaces in the original folder's name.

The procedure for all this is pretty much identical in the Debian GUI.

So now you want to get your sync on. So you start up Unison, double click your profile and perform the first syncing. Remember, you're starting out with identical folders, so the first sync is just Unison recording what's what. The only thing you have to note is the direction of the arrows. "-->" means local to remote and "<--" means remote to local. Mark all changes by clicking the left-to-right arrow, then click the "Go" button and it should finish shortly. From then on Unison should only transfer the files that have been changed, and only the parts of those files that need updating. That way you're not uploading huge files when you just need to update small parts of them.

This is also really useful for syncing to a USB thumb drive. You wanna minimize the writes, right? When setting up a profile for that, you just use the "Local" option instead of "Remote" and enter the drive's path. There are a couple of cautions for us PowerPC users, though, in syncing to a USB drive formatted as FAT32 (or any OS X to Windows syncing). Unison will give you errors about permissions and resource forks, so you want to add the following lines to your thumb drive profile:

perms = 0
rsrc = false


These will tell Unison to leave out permissions and resource forks. If you need to preserve resource forks, you can compress the file in a .sit container. And one more thing, when syncing make sure your drive is actually mounted, because if it isn't Unison will think the sync folder is empty and will attempt to delete your files. :o

Anyway, here are a few more links for further reading, including all about syncing more than two computers--star topology--and all that. Have fun!

Unison Manual
UNIX/Linux: HowTo Use unison File Synchronizer
File Synchronization with Unison
Unison - ArchWiki

(UPDATE: Note to self, when changing the names of folders, make sure to also change the corresponding folder names in my .prf file. Otherwise much confusion arises.)

Wednesday, September 11, 2013

A Debian Jessie Update

Since Wheezy turned stable, I've been running Jessie on a spare iBook with varying degrees of success/heartbreak, so I figured I'd throw in a progress report for those of you who are curious about upgrading (DON'T!!!!!!!!!!). I keeed.

It's actually been smooth running except for a few very slightly minor bugs. Like sound, for instance. Completely broken. I don't know if this affects every sound card, but mine isn't detected with the new kernel. Also, suspend to RAM has a very slight, minor bug. Also completely broken. I left two bug reports, No sound on PowerPC with Jessie upgrade and Suspend fails on iBook G3 Dual USB PowerPC, in case anyone wants to add to the crickets left by Debian's kernel maintainers.

Both of these problems can be dealt with, fortunately, by an easy workaround. If you upgraded from Wheezy to Jessie, you can boot into the previous kernel (3.2.0-4) by hitting tab at the second yaboot prompt and typing in "old". Afterward, sound and suspend should be back to normal. You can also install the 3.2.0-4 kernel from a clean Jessie install by adding:

deb http://security.debian.org/debian-security wheezy/updates main

(that's a space between debian-security and wheezy/updates, not a carriage return) to your /etc/apt/sources.list. After installing, follow the instructions on the sixth post on this Ubuntu thread about editing yaboot.conf to tell it to boot a specific kernel.

I suppose those problems will be eventually fixed, but with the latest update I saw even worse news. Xserver-xorg-video-radeon was updated to a KMS-only version, meaning if you have a Radeon GPU and don't have KMS activated, it throws it back to the fbdev driver, meaning video playback will suck and you'll only see 8 bit colors. You can fix the 8 bit colors problem by passing the yaboot parameter "video=radeonfb:1024x24-32@60" at start up (replace 1024x768 with your native resolution). This is familiar to anybody who followed zen's guide to installing Lubuntu. However, this won't help you speed up video playback which, as mentioned, sucks with fbdev.

You can always activate KMS with the yaboot parameter "video=radeonfb:off", but there are downsides (along with the upside of enabling 3d). First, KMS breaks suspend on PowerPC and I found no indication work is being done to correct this. Also, your keyboard brightness keys may not work. But worst of all, when I tried enabling KMS on two of my machines, I got a black screen (iBook) and persistant system freezes after boot (Sawtooth). So KMS is totally unusable for me. So how do I get back my fast 2d desktop with decent video playback that I had with the old radeon driver?

(UPDATE: You can greatly improve window-dragging performance by running Compton ["compton -b" to run it as a daemon])

Fortunately you can downgrade select packages. I'm sure there's a more elegant way by using dpkg, but here's my quick and dirty way of downgrading to the previous radeon driver. First, edit your /etc/apt/sources.list and change all the listings from jessie to wheezy. Then do a sudo aptitude update to update the repositories, then switch to a console and kill X with sudo /etc/init.d/yourloginmanager stop, and then (on one line):

sudo aptitude remove xserver-xorg-video-radeon

Aptitude told me it needed to remove two dependencies, xserver-xorg-video-all and xserver-xorg-video-ati as well, so I said fine and proceeded. Next, I reinstalled the drivers using the old wheezy repositories with (one line):

sudo aptitude install xserver-xorg-video-radeon xserver-xorg-video-all xserver-xorg-video-ati

There's one more step and that's to put a hold on the radeon driver, that is, to tell your package manager to keep it at that version and never upgrade it. I found the instructions for that at Not So Frequently Asked Questions, but it's basically:

sudo -s

to make yourself root. And then (on one line):

echo xserver-xorg-video-radeon hold | dpkg --set-selections

and to confirm the new setting:

dpkg --get-selections xserver-xorg-video-radeon

Finally you'll want to revert back to the Testing repositories by restoring your edits to /etc/apt/sources.list and running sudo aptitude update again.

Afterward when I did a full-upgrade to upgrade all my packages, the video-all and video-ati packages were upgraded, which I didn't care about, but the radeon package remained at its old version. Now when you startx or reboot, your desktop should be back to its old snappy self.

I should note here, you should be cautious about putting holds on packages. It's possible you can have a cascading amount of packages held back from upgrades as the dependencies on that original held package build up. But in this case with the radeon package it hasn't been a problem, but it's something to keep an eye on. I just made sure to save a note about how to hold and unhold packages from the above link.

^
^
^
No.

One more snafu you should be aware of, the new gtk-3-0 update will break some themes causing gtk3 applications to quit immediately upon open. I'm not sure this is a bug that will ever be fixed since the problem is supposedly with the themes themselves. So if yours breaks, you can either wait for the theme maintainer to release an update or find a new theme (and given I hate all themes, except one which I find satisfactory but which is now broken, this is an unfortunate burden). --UPDATE: or you could take the gtk-3.0 folder out of your theme folder from ~/.themes and use gtk3 apps without a theme.

I didn't bother downgrading gtk-3-0 because it had too many dependencies. It would've gotten too weird.

^
Looks like this bug is fixed.

So that's where Jessie is. I admit to being discouraged and depressed about it, especially on the graphics side. A few years ago I had this vision of Linux on PowerPC always getting better and better, but with support for older graphics cards being dropped left and right, and now this KMS-only business, it looks like we'll be patching together systems with sticks and chewing gum for the foreseeable future.

Maybe the Debian team can be convinced to realize they found perfection with Wheezy and to maintain it with security updates and backports for like the next ten years, or at least until our PATA hard drives burn out ;)

Sunday, September 1, 2013

Protect Your Surfing Over Public Wifi

Welcome to Part Three in a series of posts on privacy and security. Before, we talked about Tor and email encryption to keep the NSA away, but today's post will deal with the threats hackers pose, and probably your biggest vulnerability point, surfing over public wifi. Anytime you take your shiny old Mac to a Starbucks and have people gawk at its heretofore undiscovered form factor, you're connecting to a public network susceptible to hackers sniffing for and grabbing all your clear text data. They can see your surf habits, grab passwords, email, or worse. But you still want to surf, right? The solution to all this is encapsulated in the phrase encrypt all the things.

Let's start with the step so obvious I forgot to put it in the first version of this post ;) Turn on your laptop's firewall in OS X's Preferences --> Sharing --> Firewall, and also check that Stealth Mode is enabled by clicking the "Advanced..." button. Linux users can enable their firewall with ufw (Uncomplicated Firewall) or its GUI frontend, Gufw.

Back to encrypting all the things. The simplest and most basic thing you can do is install the Firefox add-on HTTPS Everywhere. This will enforce HTTPS encryption for all traffic on sites that support it and prevent those sites from reverting back to HTTP after you log in.

Got email to send? Encrypt it, or you don't send it. It's really that simple.

If you're chatting, use OTR (off the record) encryption. Pidgin and Adium support it. There's also a Firefox add-on called Cryptocat that in theory looks awesome but suffered a slight scandal recently when it was revealed it had a huge security hole caused by a rookie mistake by the developers. So you may want to avoid that.

As long as we're talking about Mozilla browsers, TenFourFox and Iceweasel users might want to take steps to protect their passwords because, locally anyway, they're, um, completely unprotected. In a fit of jealousy and envy at your beautiful PowerPC Mac, some miscreant could steal it and have access to all your passwords with a simple trip to the Preferences. So go into Preferences --> Security and set a master password. We don't want to make it that easy for 'em.

All that's well and good, but what if you want all your web traffic encrypted, not just HTTPS supported sites? Here's where things get cool. If you have an old Mac lying around not doing anything, you could turn it into a headless SSH server. Then you can set up a SOCKS proxy and tunnel all your web traffic at Starbucks through an encrypted connection to your home server and then on to its ultimate destination. Hackers locked out.

Setting up a server is as simple as it gets. On Debian Linux, if it's not already installed, just install openssh-server and it should automatically run as a daemon. On OS X, go to System Preferences --> Sharing and click the checkbox next to Remote Login. And that's it! Your computer's now a server. You may also need to forward a port on your router. Port 22, TCP only, is standard for SSH.

(UPDATE: I've also learned routers running on Tomato or DD-WRT firmware have their own SSH servers built in, so you don't even need another computer. Set up your router with instructions for Tomato or DD-WRT.)

Now that that's all set, let's open a tunnel from your obnoxiously chic coffee shop. In a terminal, enter:

ssh -CND 9999 user@hostname.com

where user is the username on the server machine and hostname.com is your server's ip address or a hostname you got from DynDNS or an alternative like No-IP or FreeDNS. You'll be prompted for the username's passphrase and you're in. It should be noted that for even better security, you can look into generating SSH public and private keys for passphrase-less login, but that's a bit beyond the scope here. Now leave the terminal window open and move on to configuring your browser.

Under Manual configuration, you'll want to set it to SOCKS host: 127.0.0.1, port 9999, SOCKS v5. Also, No Proxy For: localhost, 127.0.0.1. In TenFourFox, it looks like this (Preferences --> Advanced --> Network --> Settings):

TenFourFox proxy preferences

(Note, to switch back click the "No proxy" or "Use system proxy settings" button.)

To also prevent DNS leaks, go into about:config and change network.proxy.socks_remote_dns to "true." That way your DNS requests are encrypted through your SSH tunnel as well. To plug DNS leaks in other applications, Privoxy is your best option.

In TenFourFox/Iceweasel, anyway, you're good to go. Or as hackers might see it, gvES R∆∂®456E Rkop∫∆®∂ßghZX∂ ≈߃®∆∆kj lytudGFø πµ˜ç√ß∂ß®dfew∫µˆ∆†¥ ƒƒçFGESR˚∆ƒ©ß®ƒç∫∆ NMFGçƒ∆¬∆˚FXgfgdzdx ∫√∂ƒ≈∂ƒGFFDRGHY©√ƒ∂ƒ©g

Encryption humor. Then when you want to terminate the session, hit ctrl-c in the terminal and you're out. To keep from having to switch your browser preferences every time, you can create a separate user profile or look into an add-on like FoxyProxy.

That takes care of encrypted web browsing, but what about encrypting all your traffic, HTTP, NNTP, Bittorrent, everything? For that you need to connect to a VPN (Virtual Private Network). There are some free ones, but for anything good you have to pay. On the client side, Tunnelblick still supports Tiger and PowerPC, so go over and download that if you want to give VPNs a try. On Linux, openvpn is both a client and server package from the command line. And there's gadmin-openvpn-client for a GUI.

And for the truly adventurous, you can eschew VPN paid services and set up your own VPN server on that headless Mac we were talking about. I tried to do this with OpenVPN, but so far I've struck out. If your kung fu is better than mine, you can install openvpn with Tigerbrew or MacPorts (the port is called openvpn2) on OS X or with your package manager on Linux. I'll leave some links on the subject that may be helpful or may just pull you in deeper.

Some Mac-centric instructions:
http://remonpel.nl/2012/02/set-up-an-openvpn-server-on-your-mac/

Get easy-rsa here:
https://github.com/OpenVPN/easy-rsa (the instructions in the above first link show easy-rsa is installed with openvpn, but in newer versions you have to install easy-rsa separately)

How to solve a certain error message:
https://ubuntuforums.org/showthread.php?t=2001055

Alternately, you can set up a VPN server on your DD-WRT router:
http://sriramk.com/ddwrt-pptp-vpn

OpenVPN's HowTo:
http://openvpn.net/index.php/open-source/documentation/howto.html

Apparently there's some extra setup to get OpenVPN to really really tunnel all traffic through the server:
http://blog.johnford.org/openvpn-tunnel-to-home-server/

Finally, on the theme of security, Cameron Kaiser passed on word of a jaw dropping security hole involving sudo in OS X. Fortunately the fix is simple, and you can read in his comments section on how to use vi or nano to do it. Seriously, you'll want to fix this.

Wednesday, August 21, 2013

Update on Tor Post

I just want to mention, I added an update with some important information to my Tor post below, in case you missed it.

And I'll just leave a link to my Encrypt Your Email on Your Mac post because for some reason Google won't index it. Conspiracy???

Tuesday, August 20, 2013

Encrypt Your Email on Your Mac

After you're done Torifying, as described in my last post, the next step in securing your online life is email encryption. As it's now common knowledge that our emails are basically government property, you'll want some technology on your side to keep your emails private when they absolutely have to be. The technology is called PGP, or Pretty Good Privacy. Most people can install it to work with their email clients relatively painlessly, but for PowerPC users, there are a few hoops to jump through first.

You're gonna need to install GnuPG. GPGTools used to be the go-to people for distributing OS X binaries, but they stopped developing for PowerPC, so we're gonna have to compile it ourselves, which requires XCode. You can then compile gnupg with Macports or Tigerbrew (see this Tigerbrew issue first), or roll your own following the easiest build instructions ever. Linux users can simply install gnupg with your package manager. Let me interject with a brief cautionary tale. If OS X users are thinking of installing gnupg2 instead, don't, unless you can work the command line to make gpg-agent play nice with Enigmail (UPDATE: Or maybe it's a pinentry problem. Hmmmm.). If you don't know what that means or don't care, stick with gnupg and you'll save yourself some serious hair-pulling.

Now that gnupg is nestled safe in one of our various /bins, it's time to start up our email client. This is where all of you are going to convert to Tenfourbird, you pissant holdouts, and use a client for grown-ups. You're gonna need the add-on Enigmail, but you can't install it the normal way 'cause it's not compiled for PowerPC. So you need to go to Tenfourbird's download page, pick up the Enigmail add-on for your processor, then install it by dragging it to Tenfourbird's Add-ons Manager (invoked by Tools --> Add-ons) or choosing "Install Add-on From File..." from the tool menu inside said Add-on Manager.

Linux users can simply install Enigmail with your package manager (I'm beginning to sense a pattern). If you're on Debian, you're using Icedove, and on Ubuntu it's Thunderbird, but Tenfourbird, Thunderbird, Icedove, they're all the same.

Now when you restart Tenfourbird, you'll see a new menu item, OpenPGP. This is where you create your public and private keys. You need one public key to share with your contacts and one private key to keep to yourself. Then you can start encrypting and decrypting like you're Julian Assange wanted by the world police. From the OpenPGP menu, select Preferences and make sure it's pointing to the correct gpg binary, whether it's in /opt/local/bin or /usr/local/bin or wherever. Close that, then from the OpenPGP menu, select Setup Wizard and from there it's pretty self-explanatory. By default it sets your keys to expire in five years, but you can change that later using gpg from the command line. In fact, you could do all this from the command line which would give you a better understanding of how all this stuff works. Anyhow, once the Setup Wizard generates your keys, you should export them to file for keeping in a safe place with OpenPGP --> Key Management and then right-clicking on your key and selecting Export Keys to File. It may also have been necessary to go into Tools --> Account Settings and select OpenPGP Security under your account to enable OpenPGP support, but I'm having a memory lapse.

In case of other memory lapses, check out this link and this one for more detailed instructions and with pictures, too. Of particular interest are how to exchange public keys and also how to revoke a key if you do something stupid like email your private key in an unencrypted attachment through a Gmail server (oops*).

Here I'll mention a few caveats. First, Tenfourbird had a GUI bug where the OpenGPG menu on the Compose window wouldn't show check marks by the "Encrypt Message" item after being selected, but the encrypt icon in the status bar illuminates and the "Encrypt Message" item in the main menu is correctly checked. So just be aware of that.

Also, Gmail users, or I guess IMAP users generally, will want to be very cautious of how your draft messages are saved. It should always prompt you to save a draft as encrypted, but if for some reason you hit the wrong button, your super-secret private message will end up unencrypted on a basically public server. Just to be safe, I have my client set to save all drafts locally like this (picture is of Tools --> Account Settings):

Tenfourbird account settings

Also, some general Tenfourbird performance tips: checking "Enable Global Search and Indexer" in Preferences --> Advanced --> General will slow performance as it's indexing, so you can uncheck it if you don't want it. And if you don't want to download all your IMAP messages locally, uncheck "Keep messages for this account on this computer" from Account Settings --> Synchronization & Storage.

What about Mail.app, you ask? There's an old GPG plug-in you can download from Mediafire. GPGTools just revamped their website and took it down literally days ago. The plug-in won't work with the gpg binary in /opt/local, so you'd need to compile it yourself into /usr/local. In that case, you may need to generate your keys from the command line as I don't see a way to generate them through the plug-in. There's more on that from this page last modified in 2009, meaning it's very unsupported and you should probably move on.

For users who prefer a web mail interface, there's a couple of Firefox add-ons. One is WebPG which has "experimental" Gmail integration, and the other is Mailvelope which is in alpha, so alpha that you have to compile it yourself. But they both look very promising for the future.

All that said, I'm really impressed with Tenfourbird. I'd always clung to Mail.app when I was just downloading from a POP account, but when I started spawning several Gmail addresses, I made the switch and it handles everything great, including encryption. And you can even torify it with Jacob Appelbaum's TorBirdy add-on. And if you ever want to suppress the user agent from email headers, GHacks has a page about it right here.

*Lucky it was just practice.

Sunday, August 11, 2013

Tor for Your PowerPC Mac

*UPDATE BELOW*

Awhile ago I wrote a post on Tor for Tiger, but since it's outdated it's time to update. In fact, I plan to follow this post with more privacy tips, including how to encrypt your email in Mail.app and TenFourBird. But for this post the focus will be on Tor.

Unless you've been under a rock, you know the NSA is collecting it all and seeking to keep permanent records of all your internet activity (cringe). While not alarming to most individuals in an immediate sense, just the awareness of all this cataloguing can have a chilling effect on how we think and act and can stifle a lot of the creativity and risk-taking that make a free society thrive. Unless you think East Germany was a model of creativity and innovation. Okay, they did use creative methods to win Olympic gold medals, but my larger point stands.

And it's not just the NSA. Many governments take a stalker's interest in what you're doing on the internet, and there are times when we need to protect ourselves. Case in point: bloggers. If you have something to say but are afraid of getting arrested (or sued), Tor will help you stay anonymous by running your traffic through proxies and masking your real identity, i.e. your IP address.

Normally the Tor Project recommends users download their browser bundle, which is the current Firefox ESR specially configured with Tor, but since they're no longer compiled for PowerPC, that puts us in a bit of a jam. Fortunately you don't need the bundle. You can just install Tor and configure your browser manually. On OS X you can install Tor with Tigerbrew or MacPorts. On Linux, just use apt-get or aptitude to install it.

For OS X, you start up Tor by entering tor in the terminal (you can also set it as a launch daemon on startup, though I've read tor has trouble regaining connections after OS X wakes from sleep). It'll give you a bunch of output messages as it establishes a connection, and once that's done, you can go to TenFourFox's Preferences-->Advanced-->Network and click the Settings button next to "Configure how TenFourFox connects to the internet". Select "Manual proxy configuration" (remember, to switch back click "Use system proxy settings") and for "SOCKS Host" enter 127.0.0.1 and 9050 for the port. Also, where it says "No Proxy for:" enter "localhost, 127.0.0.1".

TenFourFox proxy settings

Now you should be ready to browse anonymously, so go to https://check.torproject.org and it should say in bright green, "Congratulations. Your browser is configured to use Tor."

Good news, but it doesn't mean you're necessarily safe (see update below for additional information). There are certain precautions to take when using Tor, like running NoScript, which blocks all javascript by default. It was recently discovered that someone, presumably with the FBI or NSA, used a javascript hack to obtain Tor users' real IP addresses because they didn't have javascript disabled. That's fine for breaking up kiddie porn rings, but not so fine for the rest of us. So run NoScript. Also, do change your User Agent string. If it has Tiger or PPC in it, it'll make you stick out like a sore thumb. The default user agent for Tor Browser Bundle is currently "Mozilla/5.0 (Windows NT 6.1; rv:17.0) Gecko/20100101 Firefox/17.0" and you can find how to change it in various browsers including Firefox here (or, more conveniently, there's the User Agent Switcher add-on). And one more thing, make sure Tor and your browser are updated.

On Linux, Tor automatically runs as a daemon after install, so you don't need to start it up in a terminal, but the TenFourFox instructions above apply to Iceweasel.

Also, you can set up OS X's Network Preferences to use Tor as a system-wide proxy for other applications by following steps 3 & 4 here, but I'm not sure how secure that is if the software we're talking about is no longer supported. You can torify TenFourBird by using the TorBirdy add-on instead.

Last thing I'll mention, if you don't want to use Tor all the time but want all your searches anonymous, one option is DuckDuckGo, but if you like Google better, there's Startpage. It gives you the same search results as Google, but it's done through a proxy so Google has no idea who you are. The plugin for your TenFourFox search bar is here, and many more search plugins are found here.

UPDATE: Apparently with the above TenFourFox/Iceweasel configuration, there is the threat of DNS leaks. The warning message is this:

[warn] Your application (using socks5 to port 443) is giving Tor only an IP address. Applications that do DNS resolves themselves may leak information. Consider using Socks4A (e.g. via privoxy or socat) instead. For more information, please see https://wiki.torproject.org/TheOnionRouter/TorFAQ#SOCKSAndDNS.

This can be corrected in TenFourFox and Iceweasel by going into about:config and changing network.proxy.socks_remote_dns to "true." This will force dns requests through the proxy and the warning will disappear. You could alternately install Privoxy and set it to use Socks4A like the warning recommends. This will protect you in applications other than your browser as well.

Incidentally, to avoid having to change all these preferences between Tor and non-Tor sessions, you can create a second profile in TenFourFox for just your Tor preferences/add-ons. I experienced a bug in the GUI Profile Manager, so I created a new profile in the command line with this:

/Applications/TenFourFox7450.app/Contents/MacOS/firefox-bin -CreateProfile Tor

where Tor is the name of my new profile, and TenFourFox7450.app is the name of the app in my Applications folder (yours may be different depending on your processor type). Now I have two profiles to choose from, default and Tor. To choose which one at startup, enter in the command line:

/Applications/TenFourFox7450.app/Contents/MacOS/firefox-bin -p

to bring up the Profile Manager window. Uncheck the "Don't ask at startup" box and the Profile Manager will appear every time you startup TenFourFox allowing you to choose.

There weren't any bugs in Iceweasel's Profile Manager, which you can simply invoke with iceweasel -p.

Sunday, July 28, 2013

Make Animated Gifs on PowerPC

Since animated gifs are the weapon of choice in spreading internet memes around the world and aren't going away anytime soon, there's no reason for us PowerPC users to be left out in the cold. There are several applications that make animated gifs on Windows and Intel-only versions of OS X, but finding applications that do the job on PowerPC, particularly making gifs from video clips, is more daunting. Thankfully there are a couple of open source, cross-platform tools that we can combine to grab the video and then export as gifs, namely avidemux and GIMP.

First, download and install avidemux. On Debian, it's available in the deb-multimedia repositories. On OS X, you can download version 2.4.4 which works on Tiger from SourceForge (your choice of QT4 or GTK versions). Then follow the instructions on HOW-TO: Make an animated gif for using avidemux to extract a clip from a video file, specifically using the "A" and "B" buttons and then saving the selection as jpeg images. Hopefully you created a folder for them because it'll output dozens or even hundreds of jpegs.

Next step is to install GIMP if you haven't. On Debian it's in the official repositories, and Tiger and Leopard versions can be downloaded from this site. Then follow the instructions again from the above HOW-TO, using Open As Layers, maybe opening one out of every three or four frames, then do all the cropping and resizing you want, and export as an animated gif.

Done!

And for viewing gifs outside a web browser, there's Xee on OS X and GPicView on Linux.

Here's a quick sample I made. Feel free to re-purpose:


Saturday, July 27, 2013

Wednesday, July 17, 2013

Cool Legacy Apps for OS X

Some apps out there never seem to die. Their developers subsist on a near-lethal cocktail of cigarettes and Red Bull to keep burning the midnight oil so they can deliver new version after new, year after year. How long has Audacity been around? Or GraphicConverter?

However, some developers want off that train and they drop out. Understandable, but that doesn't mean their software has to die with their masochism, I mean, ambition. With that in mind, I thought I'd give a run-down of several software titles whose development has ceased but are still useful and very much not available in the App Store. Let's do this list style:

Bean - An extended version of TextEdit with added features such as live word count, full screen editing, inline graphics, and more. A great, fast alternative to Microsoft Word.

CocoViewX - An iPhoto replacement without the bloat and bizarre file management, CocoViewX offers photo browsing, meta data editing, camera import, and html export.

Cog - This was a music player that I tried out a few years ago in my never-ending quest to replace iTunes. I didn't stick with it because it lacked an equalizer, but now that I have a global equalizer it's no longer an issue and I'm iTunes-free. Cog also properly supports ogg and flac files and handles large libraries with ease.

Desktop Manager - Spaces alternative for Tiger. It just works.

FormulatePro - Want to edit pdf files but don't want Adobe products clogging up your computer? FormulatePro is a good lightweight tool for this. You can insert text, check marks, and also make use of simple drawing tools.

HimmelBar (link updated) - This is an application launcher that sits in your menubar. It looks for applications in common folders like Applications (duh!), Utilities, and Developer and puts them all in one menu for easy access.

Perian - Not an application, but a plugin for Quicktime Player, it lets you play many many many different video formats.

Play - Very similar to Cog, and people on their user forums observed that Play just sounded better than the competition.

Seashore - Photo editor inspired by GIMP but much more lightweight (and more modest in features). Supports layers and you can also save in GIMP's native xcf format, among others.

I'm sure there are many more for the graveyard, but just because the projects are dead doesn't mean we can't still put them to good use. And we can remember fondly when there was a vibrant freeware/shareware community for OS X before it was destroyed by the App Store. Cheers!

Thursday, July 4, 2013

What To Do With Your Old PowerPC Mac

In various forum threads and chest thrusting rituals, often the subject comes up, "What do I do with my old Mac?" There are the common answers like fileserver, iTunes server, even Bit Coin miner, but for this post I want to recommend an option I don't often see--Linux testing machine. As open source community projects, Linux distributions rely on the community (you) to test and file bug reports to ensure the optimum reliability of the project. And to be rewarded with a delectable spread of famous meats and cheeses (OK, maybe not).

For this we want to focus on development releases. In Debian, there's Testing and also Sid for advanced users. Ubuntu has development releases, too, but for this How-To we'll concentrate on Debian since Ubuntu is based on it anyway.

If you decide on Testing (Jessie as of this writing), you can install from a Wheezy disc and then upgrade, or you can directly install from a Jessie installer (found on this page). Debian Sid cannot be installed directly from a disc. You must either install Wheezy or Jessie first and then upgrade.

Installing Jessie directly is simple enough, so let's illustrate how to upgrade from Wheezy. Once any kind of Wheezy is installed, it could be just a base system without a GUI, you need to edit your /etc/apt/sources.list file. You'll see several download mirrors with either "stable" or "wheezy" in them. To upgrade to Testing, replace every instance of "stable" or "wheezy" with either "testing" or "jessie". If you want your system to stick with Jessie after it turns stable, use "jessie", but if you want to stay permanently on a Testing rolling release, use "testing".

Note here, Wheezy installs should list an additional wheezy-updates repository (not to be confused with the security "wheezy/updates" one), but there's no such thing as jessie-updates. Instead, as of right now, it's jessie-proposed-updates, so replace with that. To see which repositories are actually available for your release, enter your mirror's url in a browser (http://ftp.us.debian.org/debian in my case) and click on dists. Peter S. reported problems with this, so I think it's wrong. Just comment out the "wheezy-updates" lines (not "wheezy/updates" in the security urls) and leave it at that.

Once you got all that worked out, save and exit and run the following command to update your repositories:

sudo aptitude update

Then to actually upgrade your system, run:

sudo aptitude full-upgrade

and your kernel and all packages will be upgraded to Testing.

The procedure to upgrade to Sid is basically the same, but Sid doesn't get any security updates or sid-updates, so comment out those lines (if you don't know what "comment out" means without googling, you probably shouldn't be running Sid). Then replace "wheezy" or "jessie", whichever you installed from, with "sid" or "unstable". Then run the two commands above and your computer will explode, I mean, you'll be all set.

From then on, you can install software and report any bugs you find with Debian's reportbug program. It comes in both command line and GUI versions and includes onscreen instructions to walk you through the process. So say if you upgrade to Jessie and suddenly your sound won't work, you can report a bug against alsa-base and say "My system isn't loading the snd-powermac module. What the eff?" Or something like that.

So put those old 'Books and Power Macs to work and make those packages maintainers roll their eyes at looking up Big Endian/Little Endian problems.

Saturday, June 22, 2013

MacPorts vs. Tigerbrew

So it's time for another one of those Spy vs. Spy death match posts where I pit two competing software titles against each other, put them through their respective ringers, and conclude with, "Eh, they're both good. It depends on your needs."

Some of you may already have heard of Homebrew. It bills itself as "the missing package manager for OS X" that "installs the stuff you need that Apple didn't." In other words, it enables you to install a lot of Linux tools that aren't otherwise available on OS X. Just like MacPorts, only supposedly simpler and with less headaches. The only glitch is Homebrew has been Intel-only.

This is where Tigerbrew comes in. It's a new fork that runs on PowerPC and Tiger & Leopard. Installation is easy (instructions on the homepage) and it requires Xcode. Now we're ready to put it through its paces.

First, though, let's go back to MacPorts. Initial installation is also easy enough. Just download the installer and run (Xcode required as well). Now in order to test these two package managers out, we need a package to install. The one I have in mind is pianobar. It's a very cool console app for Pandora Radio that I'm stoked to find. Pandora has an official desktop client, but it requires Adobe Air, so screw that. Here's what I get when I install pianobar with MacPorts:

---> Computing dependencies for pianobar
---> Dependencies to be installed: faad2 autoconf m4 perl5 perl5.12 gdbm gettext expat libiconv gperf ncurses xz automake libtool gnutls gmp libtasn1 nettle pkgconfig texinfo json-c libao libgcrypt libgpg-error libmad


As you can see, 25 dependencies. After compiling all that and installing pianobar, it comes to a cool 385 MB of disk space used. Quite a lot.

Here are the dependencies when I install pianobar with Tigerbrew:

Powerbook:~ dan$ brew deps pianobar
faad2
gmp
gnutls
json-c
libao
libgcrypt
libgpg-error
libtasn1
mad
nettle
p11-kit
pkg-config
xz


That's 13 dependencies, and after all the compiling and installing it comes to about 50 MB used. This is where Tigerbrew reveals itself very different from MacPorts. Instead of installing all its own dependencies in /opt/local, independent of your system, Tigerbrew uses OS X's built-in tools, like Python, etc., whenever possible. It also installs everything to your /usr/local.

Does that mean Tigerbrew is superior? Not necessarily. Having a package manager utilize /usr/local has been met with some contention and many people feel MacPorts' way is ultimately better, but with this little demonstration I think we can say Tigerbrew is superior if you're just looking to install a random utility or console app and don't want the massive overhead of MacPorts. MacPorts, on the other hand, may be better if you want to install a ton of packages where the initial overhead would be minimized. There seems to be debate about these issues, though.

Can you use them both side-by-side? Yes, but only if you know what you're doing. You have to be aware of your $PATH and whether you have duplicate tools in /usr/local and /opt/local. Also, when compiling with Tigerbrew, it's probably smart to temporarily move /opt/local to your home folder so there are no conflicts.

A note on pianobar. You can set it to auto-login on startup by creating ~/.config/pianobar/config and adding:

user = youremail
password = yourpassword

along with any other options you want. And there's shell.fm for a console Last.fm client.

pianobar screenshot:

pianobar on OS X

Saturday, June 15, 2013

Mounting Linux Partitions in OS X

So I'm dual booting Tiger and Debian on a Powerbook, and miserly me, I didn't set up an extra sharing partition to transfer files between the two. I didn't want that extra hard drive space to go mostly to waste, so I just decided not to deal with it. So where does that leave me now? I could SFTP to another computer and then back again. I could mount the OS X volume in Linux and read from its ~/Public folder. But what if I'm in OS X and want to mount my Linux partition and copy files over from there? I'm SOL, right? Not so fast.

With the install of a couple of tools, MacFUSE and fuse-ext2, you can mount ext2/ext3/ext4 filesystems in OS X. First caveat: I haven't had the guts to write to my Linux partition from OS X. I'm not sure how stable it is and I had no pressing need to experiment. But feel free to be your own guinea pig! That being said, I've had no problems mounting as read-only and copying files from Linux to OS X. So here's a quick how-to.

After you've installed MacFUSE and fuse-ext2, reboot unless you're one of those smartypants who knows you don't have to. I didn't want to find out if I was wrong, so I wimped out and rebooted. This is already going off on a tangeant. I'm also being distracted by pianobar running on Tiger (more on that later). I'll try to be better.

Anyway, once all that's done, fire up Terminal.app and create a new directory in your /Volumes folder with this command:

mkdir /Volumes/your_folder_name

(UPDATE: For some reason the folder disappears on me after reboot. I can just create it again as needed, but I don't know why it does this.)

I named mine /Volumes/Linux, but you can choose your own. Then you want to find out the identifier of your Linux partition. So run diskutil list and you should see your Linux partition among the output. The right column gives the identifier, in my case disk0s5. Now with that handy info you can mount your Linux partition with:

sudo fuse-ext2 /dev/disk0s5 /Volumes/Linux

Obviously replace disk0s5 and Linux with your own particulars. Only there's a bit of a problem here. In Tiger, and I think this is only an issue in Tiger, when you open /Volumes/Linux in the Finder, the folder disappears. Rather vicious bug, but you can still access it in the Terminal with standard commands like ls, cd, and cp, etc.

Also, the above mount command is read-only. If you want to try read/write and see how that goes, add "-o force" to the command.

Unmounting is a simple sudo umount /Volumes/Linux.

If you want the reverse, say total access to your OS X volume while booted in Linux, that involves a couple of issues. First, it'll be read-only unless you disable journaling in OS X. You also won't have access to OS X's home folder (except ~/Public) due to permissions issues. You can read all about how to get around that here and here. I haven't gotten around to experiencing this firsthand, so I'll farm it out to those links. Have fun!

Sunday, June 2, 2013

Getting a Usable Trackpad on an Aluminum Powerbook in Debian

(UPDATE: In Debian Jessie, my trackpad performs much better.)

I got an aluminum Powerbook off eBay since I decided using a Sawtooth manufactured 13 years ago as my everyday computer was sad, and that a Powerbook from 2006 would be slightly less sad. Actually, all the other choices were even less palpable. Maybe I'll write a post about why decided to stick with PowerPC, but for now I wanted to focus on one thing. After putting Debian on my Linux partition and booting into it, wow did this trackpad suck. Like slow as molasses. And it wasn't a hardware problem. It worked perfectly in OS X. After doing a bit of googling, I found out it's a common problem among Powerbooks from 2005-2006 and the solution is in configuring the synaptics driver.

So here's what you do. First, you should already have the driver, xserver-xorg-input-synaptics, installed as part of the Xorg meta package. Next, you want to open Leafpad or whatever text editor you have and paste the following in a new file:

Section "InputClass"
   Identifier   "Touchpad"
   MatchIsTouchpad   "yes"
   Driver   "synaptics"
   Option   "SHMConfig"              "true"
   Option   "MinSpeed"               "0.3"
   Option   "MaxSpeed"               "1.0"
   Option   "AccelFactor"            "0.25"
   Option   "LeftEdge"               "0"
   Option   "RightEdge"              "950"
   Option   "TopEdge"                "0"
   Option   "BottomEdge"             "645"
   Option   "FingerLow"              "3"
   Option   "FingerHigh"             "7"
   Option   "TapButton1"             "1"
   Option   "TapButton2"             "0"
   Option   "TapButton3"             "0"
   Option   "VertTwoFingerScroll"    "1"
   Option   "HorizTwoFingerScroll"   "0"
   Option   "LockedDrags"            "1"
EndSection

These settings give you left-click tapping, vertical two-finger scrolling, and locked dragging where you have to click again to release the drag. The FingerLow and FingerHigh values are very low to compensate for the initial (non) sensitivity of my trackpad. If this is too sensitive for you, you can up the values to 10 and 30, respectively, or higher. You can also look up man synaptics for all the options and also synclient -l for a list of your defaults.

Next, save the file as synaptics.conf and create a new folder with:

sudo mkdir /etc/X11/xorg.conf.d

Finally, copy the synaptics.conf file into the newly created folder with:

sudo cp /path/to/your/synaptics.conf /etc/X11/xorg.conf.d/synaptics.conf

Now when you restart your X session your new settings should be in effect. In my case it's made for much smoother scrolling, though still not as good as on OS X. Occasionally the trackpad is non-responsive and I have to wake it up with an extra swipe or two.

Another issue specific to these Powerbooks is the keyboard backlight. Via the MintPPC forum, you need to put i2c-dev into /etc/modules and after reboot your keyboard backlight keys should work. Easy.

Tuesday, May 28, 2013

Cool Screenshots

Reader Eric H sent me these screenshots I thought I'd share. They're of Debian/MintPPC Wheezy on an iBook G3 600 MHz with custom theming. Very cool.


Also, MacRumors poster Wildy left an update on a Crunchbang-like port for PowerPC, hopefully to be released later this summer. Screenshot is here.

So put one of these distros on your 'book, take it to a coffeeshop, and get ooos and ahhhs.

Tuesday, May 14, 2013

Finder Alternative for Linux

I sometimes meander on the web a bit and read Linuxy things that are mostly over my head, and when I read about qt vs. gtk and how qt was the future, I suddenly decided I hate, no, despise, gtk apps. I don't know what triggered this sudden insatiable need to minimize the gtk look from my life, but here it is. Maybe it has to do with using a couple of qt apps like LMMS and Hydrogen, which just look and feel more professional. I also had a brief misadventure burning a CD and couldn't bear to look at another half-assed GUI, so I installed a couple of command line tools to solve my problem. And I got to thinking, I should be going to the command line a lot more. There's something about it that's more fun. So I went down a list in my head of all the programs I could use in a terminal instead of a GUI when I came to file managers. I'd been using PCManFM and Thunar and was never totally satisfied with either, plus I was growing to hate that gtk three-pane look. So I thought, "I'll just do it all in a terminal and brush up on my rm -rf / commands" (joke--don't run this). But then I remembered another file manager, ROX-Filer, that I wanted to take another look at.

I used it once before, but I guess it was a little too eccentric to take an immediate liking to. Eccentric in that it wasn't like all the other Linux file managers, but on a second spin it reminds me of something from the past. If you ask, "The Mac OS Finder?" give yourself a prize! Look at the screenshot below and you'll see ROX-Filer values the same simplicity.

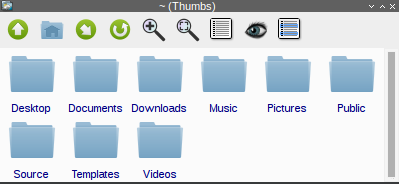
ROX-Filer

Ironically, I guess, it's a gtk app, but it has a very minimal look with no menu bars or double or triple panes and borders that look like they were made by grade school students. And there's one more thing you get with this minimalism--speed. ROX-Filer is fast. When opening the first time, it's fast. When opening multiple windows, it's fast. When loading hundreds of jpeg thumbs, it's fast. It leaves PCManFM and Thunar in the dust and brings back the feeling of the old Finder.

I've quickly grown accustomed to navigating in it. You can open new folders in the same window much like the OS X Finder, and you can also open folders in new windows with middle-click (Note that ROX-Filer is set to open folders/files with single-click by default, and if you change it to double-click, using middle-click to open folders in new windows doesn't appear to work. You instead have to right-click and choose New Window from the options.). Another useful item is the bookmark toolbar icon (the diagonal arrow button in the screenshot, your icons may differ). Here you can set bookmarks for all your commonly accessed folders, including /media/cdrom0 which is where your mounted CDs and DVDs are.

The only thing I didn't like was MIME types weren't automatically set, so to launch a file you have to set the run action manually for each file type the first time, though after that you don't have to worry about it. Maybe it's different if you're running a proper desktop environment and not pure Openbox.

All in all I'm liking it, and it'll probably save me one day from accidentally erasing my hard drive ;)

Monday, May 6, 2013

Debian Wheezy Goes Stable

I just noticed Debian Wheezy went stable a couple of days ago. I can't believe I missed all those wild and crazy release parties.

Monday, April 29, 2013

Sync Folders On Your LAN with BitTorrent Sync

There's a new syncing service and this one's a little different. Have you ever just wanted to sync your folders without involving the cloud? Here's your chance with BitTorrent Sync. As the name suggests, it uses BitTorrent technology to sync any folder across all your PCs and NAS devices on your home network. The only caveat is you need the client running on both computers, and the OS X version requires Snow Leopard, so Tiger and Leopard users are out of luck. So why is this appearing on a PowerPC blog? Because incredibly BitTorrent Labs compiled a PowerPC version for their Linux client. I've used it to sync folders on a MintPPC desktop and a Debian laptop, and though it's still in alpha and doesn't have many advanced features, it worked flawlessly.

Here's how to get it going. First, download the correct version (Linux PowerPC for your PowerPC Macs) and extract it to any directory in your home folder. Then either use your file manager to open that directory in a terminal, or in a terminal type the command cd path to directory holding the btsync binary. Then get the btsync daemon running by entering ./btsync.

Nothing happened. That's 'cause you have to use the web interface, silly! So get your IP address with sudo ifconfig (among other methods), fire up a web browser and go to yourIPaddress:8888/gui. In my case:

192.168.1.105:8888/gui

Next you should see the web interface where you can click Add Folder. Type the path to it, /home/yourusername/whatever, and then click the generate secret button. You will enter that secret into your other computer to sync to that folder. So do the same thing on your other computer. Extract the binary, startup the daemon, bring up the GUI, and add a folder to sync, this time entering the secret from your other computer into the Secret field instead of generating a new one. Now the syncing should start--Snow Leopard users may see a delay of up to ten minutes which BitTorrent Labs implies is strictly the fault of Snow Leopard ;)

I got pretty much full speed out of my wireless connection, though I haven't tested it over ethernet so I'll defer comment. Also, in their Get Started guide, they mention disabling the "Delete files to Sync trash" option means your deleted files will instead go to your system's trash folder, but on my system they just disappeared. So be mindful of that. Also there's no versioning yet, but I'd expect that in the near future. But overall, pretty cool stuff.

Monday, April 15, 2013

Software Synths on OS X

A few posts ago I mentioned Linux software synths and the wide range of choices on that platform. The unsaid implication was that choices on OS X PowerPC suck by comparison, but that's not totally true. So I thought I'd point out a few software synths freely available on Tiger to get your inner musician musicianing.

Of course, pro DAWs like Logic come with their own synths, but if you're looking to get your feet wet, these plugins should keep you occupied. And they're all AU plugins, not standalone synths, so they'll work in an AU plugin host like GarageBand.

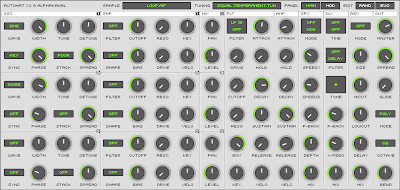
Automat

First is Automat. It's a three oscillator synth with an easy to use interface, a few dozen presets, and a great randomizer button to produce sounds you'd never think of yourself (mostly for good reason). This looks good for a beginner, though that doesn't necessarily mean you'll outgrow it.

TAL-Noisemaker

Next is TAL-Noisemaker. Its sound is "fat and full" and especially good for baselines and also for arcade sounds. Its GUI is a bit CPU intensive, but it comes with a couple hundred presets and plenty of filters. Download the .component.zip 32bit version.

Crystal

Finally there's Crystal. I had a hard time finding a version 2.4.9 that would run on Tiger, but I finally did here (there's also a CNET download link that says it's 2.4.9, but it's actually 2.5.1 which requires Leopard). Crystal is more complex than the previous two. It's got a manual I'll need to study, but it's been around forever and many people swear by it (not at it).

And finally I'll leave you with this video telling you everything you need to know to make electronic music:


How To Make Electronic Music Tutorial BY DJ NICO MALO

"Minimal effort and no talent." This man is my god.