
Wednesday, July 24, 2013

Wednesday, July 17, 2013
Cool Legacy Apps for OS X
Some apps out there never seem to die. Their developers subsist on a near-lethal cocktail of cigarettes and Red Bull to keep burning the midnight oil so they can deliver new version after new, year after year. How long has Audacity been around? Or GraphicConverter?
However, some developers want off that train and they drop out. Understandable, but that doesn't mean their software has to die with their masochism, I mean, ambition. With that in mind, I thought I'd give a run-down of several software titles whose development has ceased but are still useful and very much not available in the App Store. Let's do this list style:
Bean - An extended version of TextEdit with added features such as live word count, full screen editing, inline graphics, and more. A great, fast alternative to Microsoft Word.
CocoViewX - An iPhoto replacement without the bloat and bizarre file management, CocoViewX offers photo browsing, meta data editing, camera import, and html export.
Cog - This was a music player that I tried out a few years ago in my never-ending quest to replace iTunes. I didn't stick with it because it lacked an equalizer, but now that I have a global equalizer it's no longer an issue and I'm iTunes-free. Cog also properly supports ogg and flac files and handles large libraries with ease.
Desktop Manager - Spaces alternative for Tiger. It just works.
FormulatePro - Want to edit pdf files but don't want Adobe products clogging up your computer? FormulatePro is a good lightweight tool for this. You can insert text, check marks, and also make use of simple drawing tools.
HimmelBar (link updated) - This is an application launcher that sits in your menubar. It looks for applications in common folders like Applications (duh!), Utilities, and Developer and puts them all in one menu for easy access.
Perian - Not an application, but a plugin for Quicktime Player, it lets you play many many many different video formats.
Play - Very similar to Cog, and people on their user forums observed that Play just sounded better than the competition.
Seashore - Photo editor inspired by GIMP but much more lightweight (and more modest in features). Supports layers and you can also save in GIMP's native xcf format, among others.
I'm sure there are many more for the graveyard, but just because the projects are dead doesn't mean we can't still put them to good use. And we can remember fondly when there was a vibrant freeware/shareware community for OS X before it was destroyed by the App Store. Cheers!
However, some developers want off that train and they drop out. Understandable, but that doesn't mean their software has to die with their masochism, I mean, ambition. With that in mind, I thought I'd give a run-down of several software titles whose development has ceased but are still useful and very much not available in the App Store. Let's do this list style:
Bean - An extended version of TextEdit with added features such as live word count, full screen editing, inline graphics, and more. A great, fast alternative to Microsoft Word.
CocoViewX - An iPhoto replacement without the bloat and bizarre file management, CocoViewX offers photo browsing, meta data editing, camera import, and html export.
Cog - This was a music player that I tried out a few years ago in my never-ending quest to replace iTunes. I didn't stick with it because it lacked an equalizer, but now that I have a global equalizer it's no longer an issue and I'm iTunes-free. Cog also properly supports ogg and flac files and handles large libraries with ease.
Desktop Manager - Spaces alternative for Tiger. It just works.
FormulatePro - Want to edit pdf files but don't want Adobe products clogging up your computer? FormulatePro is a good lightweight tool for this. You can insert text, check marks, and also make use of simple drawing tools.
HimmelBar (link updated) - This is an application launcher that sits in your menubar. It looks for applications in common folders like Applications (duh!), Utilities, and Developer and puts them all in one menu for easy access.
Perian - Not an application, but a plugin for Quicktime Player, it lets you play many many many different video formats.
Play - Very similar to Cog, and people on their user forums observed that Play just sounded better than the competition.
Seashore - Photo editor inspired by GIMP but much more lightweight (and more modest in features). Supports layers and you can also save in GIMP's native xcf format, among others.
I'm sure there are many more for the graveyard, but just because the projects are dead doesn't mean we can't still put them to good use. And we can remember fondly when there was a vibrant freeware/shareware community for OS X before it was destroyed by the App Store. Cheers!
Thursday, July 4, 2013
What To Do With Your Old PowerPC Mac
In various forum threads and chest thrusting rituals, often the subject comes up, "What do I do with my old Mac?" There are the common answers like fileserver, iTunes server, even Bit Coin miner, but for this post I want to recommend an option I don't often see--Linux testing machine. As open source community projects, Linux distributions rely on the community (you) to test and file bug reports to ensure the optimum reliability of the project. And to be rewarded with a delectable spread of famous meats and cheeses (OK, maybe not).
For this we want to focus on development releases. In Debian, there's Testing and also Sid for advanced users. Ubuntu has development releases, too, but for this How-To we'll concentrate on Debian since Ubuntu is based on it anyway.
If you decide on Testing (Jessie as of this writing), you can install from a Wheezy disc and then upgrade, or you can directly install from a Jessie installer (found on this page). Debian Sid cannot be installed directly from a disc. You must either install Wheezy or Jessie first and then upgrade.
Installing Jessie directly is simple enough, so let's illustrate how to upgrade from Wheezy. Once any kind of Wheezy is installed, it could be just a base system without a GUI, you need to edit your /etc/apt/sources.list file. You'll see several download mirrors with either "stable" or "wheezy" in them. To upgrade to Testing, replace every instance of "stable" or "wheezy" with either "testing" or "jessie". If you want your system to stick with Jessie after it turns stable, use "jessie", but if you want to stay permanently on a Testing rolling release, use "testing".
Note here, Wheezy installs should list an additional wheezy-updates repository (not to be confused with the security "wheezy/updates" one), but there's no such thing as jessie-updates. Instead, as of right now, it's jessie-proposed-updates, so replace with that. To see which repositories are actually available for your release, enter your mirror's url in a browser (http://ftp.us.debian.org/debian in my case) and click on dists. Peter S. reported problems with this, so I think it's wrong. Just comment out the "wheezy-updates" lines (not "wheezy/updates" in the security urls) and leave it at that.
Once you got all that worked out, save and exit and run the following command to update your repositories:
Then to actually upgrade your system, run:
and your kernel and all packages will be upgraded to Testing.
The procedure to upgrade to Sid is basically the same, but Sid doesn't get any security updates or sid-updates, so comment out those lines (if you don't know what "comment out" means without googling, you probably shouldn't be running Sid). Then replace "wheezy" or "jessie", whichever you installed from, with "sid" or "unstable". Then run the two commands above and your computer will explode, I mean, you'll be all set.
From then on, you can install software and report any bugs you find with Debian's
So put those old 'Books and Power Macs to work and make those packages maintainers roll their eyes at looking up Big Endian/Little Endian problems.
For this we want to focus on development releases. In Debian, there's Testing and also Sid for advanced users. Ubuntu has development releases, too, but for this How-To we'll concentrate on Debian since Ubuntu is based on it anyway.
If you decide on Testing (Jessie as of this writing), you can install from a Wheezy disc and then upgrade, or you can directly install from a Jessie installer (found on this page). Debian Sid cannot be installed directly from a disc. You must either install Wheezy or Jessie first and then upgrade.
Installing Jessie directly is simple enough, so let's illustrate how to upgrade from Wheezy. Once any kind of Wheezy is installed, it could be just a base system without a GUI, you need to edit your /etc/apt/sources.list file. You'll see several download mirrors with either "stable" or "wheezy" in them. To upgrade to Testing, replace every instance of "stable" or "wheezy" with either "testing" or "jessie". If you want your system to stick with Jessie after it turns stable, use "jessie", but if you want to stay permanently on a Testing rolling release, use "testing".
Once you got all that worked out, save and exit and run the following command to update your repositories:
sudo aptitude updateThen to actually upgrade your system, run:
sudo aptitude full-upgradeand your kernel and all packages will be upgraded to Testing.
The procedure to upgrade to Sid is basically the same, but Sid doesn't get any security updates or sid-updates, so comment out those lines (if you don't know what "comment out" means without googling, you probably shouldn't be running Sid). Then replace "wheezy" or "jessie", whichever you installed from, with "sid" or "unstable". Then run the two commands above and your computer will explode, I mean, you'll be all set.
From then on, you can install software and report any bugs you find with Debian's
reportbug program. It comes in both command line and GUI versions and includes onscreen instructions to walk you through the process. So say if you upgrade to Jessie and suddenly your sound won't work, you can report a bug against alsa-base and say "My system isn't loading the snd-powermac module. What the eff?" Or something like that.So put those old 'Books and Power Macs to work and make those packages maintainers roll their eyes at looking up Big Endian/Little Endian problems.
Saturday, June 22, 2013
MacPorts vs. Tigerbrew
So it's time for another one of those Spy vs. Spy death match posts where I pit two competing software titles against each other, put them through their respective ringers, and conclude with, "Eh, they're both good. It depends on your needs."
Some of you may already have heard of Homebrew. It bills itself as "the missing package manager for OS X" that "installs the stuff you need that Apple didn't." In other words, it enables you to install a lot of Linux tools that aren't otherwise available on OS X. Just like MacPorts, only supposedly simpler and with less headaches. The only glitch is Homebrew has been Intel-only.
This is where Tigerbrew comes in. It's a new fork that runs on PowerPC and Tiger & Leopard. Installation is easy (instructions on the homepage) and it requires Xcode. Now we're ready to put it through its paces.
First, though, let's go back to MacPorts. Initial installation is also easy enough. Just download the installer and run (Xcode required as well). Now in order to test these two package managers out, we need a package to install. The one I have in mind is
As you can see, 25 dependencies. After compiling all that and installing pianobar, it comes to a cool 385 MB of disk space used. Quite a lot.
Here are the dependencies when I install pianobar with Tigerbrew:
That's 13 dependencies, and after all the compiling and installing it comes to about 50 MB used. This is where Tigerbrew reveals itself very different from MacPorts. Instead of installing all its own dependencies in /opt/local, independent of your system, Tigerbrew uses OS X's built-in tools, like Python, etc., whenever possible. It also installs everything to your /usr/local.
Does that mean Tigerbrew is superior? Not necessarily. Having a package manager utilize /usr/local has been met with some contention and many people feel MacPorts' way is ultimately better, but with this little demonstration I think we can say Tigerbrew is superior if you're just looking to install a random utility or console app and don't want the massive overhead of MacPorts. MacPorts, on the other hand, may be better if you want to install a ton of packages where the initial overhead would be minimized. There seems to be debate about these issues, though.
Can you use them both side-by-side? Yes, but only if you know what you're doing. You have to be aware of your $PATH and whether you have duplicate tools in /usr/local and /opt/local. Also, when compiling with Tigerbrew, it's probably smart to temporarily move /opt/local to your home folder so there are no conflicts.
A note on pianobar. You can set it to auto-login on startup by creating ~/.config/pianobar/config and adding:
along with any other options you want. And there's
pianobar screenshot:

Some of you may already have heard of Homebrew. It bills itself as "the missing package manager for OS X" that "installs the stuff you need that Apple didn't." In other words, it enables you to install a lot of Linux tools that aren't otherwise available on OS X. Just like MacPorts, only supposedly simpler and with less headaches. The only glitch is Homebrew has been Intel-only.
This is where Tigerbrew comes in. It's a new fork that runs on PowerPC and Tiger & Leopard. Installation is easy (instructions on the homepage) and it requires Xcode. Now we're ready to put it through its paces.
First, though, let's go back to MacPorts. Initial installation is also easy enough. Just download the installer and run (Xcode required as well). Now in order to test these two package managers out, we need a package to install. The one I have in mind is
pianobar. It's a very cool console app for Pandora Radio that I'm stoked to find. Pandora has an official desktop client, but it requires Adobe Air, so screw that. Here's what I get when I install pianobar with MacPorts:---> Computing dependencies for pianobar
---> Dependencies to be installed: faad2 autoconf m4 perl5 perl5.12 gdbm gettext expat libiconv gperf ncurses xz automake libtool gnutls gmp libtasn1 nettle pkgconfig texinfo json-c libao libgcrypt libgpg-error libmadAs you can see, 25 dependencies. After compiling all that and installing pianobar, it comes to a cool 385 MB of disk space used. Quite a lot.
Here are the dependencies when I install pianobar with Tigerbrew:
Powerbook:~ dan$ brew deps pianobar

faad2

gmp

gnutls

json-c

libao

libgcrypt

libgpg-error

libtasn1

mad

nettle

p11-kit

pkg-config

xz
That's 13 dependencies, and after all the compiling and installing it comes to about 50 MB used. This is where Tigerbrew reveals itself very different from MacPorts. Instead of installing all its own dependencies in /opt/local, independent of your system, Tigerbrew uses OS X's built-in tools, like Python, etc., whenever possible. It also installs everything to your /usr/local.
Does that mean Tigerbrew is superior? Not necessarily. Having a package manager utilize /usr/local has been met with some contention and many people feel MacPorts' way is ultimately better, but with this little demonstration I think we can say Tigerbrew is superior if you're just looking to install a random utility or console app and don't want the massive overhead of MacPorts. MacPorts, on the other hand, may be better if you want to install a ton of packages where the initial overhead would be minimized. There seems to be debate about these issues, though.
Can you use them both side-by-side? Yes, but only if you know what you're doing. You have to be aware of your $PATH and whether you have duplicate tools in /usr/local and /opt/local. Also, when compiling with Tigerbrew, it's probably smart to temporarily move /opt/local to your home folder so there are no conflicts.
A note on pianobar. You can set it to auto-login on startup by creating ~/.config/pianobar/config and adding:
user = youremailpassword = yourpasswordalong with any other options you want. And there's
shell.fm for a console Last.fm client.pianobar screenshot:

Saturday, June 15, 2013
Mounting Linux Partitions in OS X
So I'm dual booting Tiger and Debian on a Powerbook, and miserly me, I didn't set up an extra sharing partition to transfer files between the two. I didn't want that extra hard drive space to go mostly to waste, so I just decided not to deal with it. So where does that leave me now? I could SFTP to another computer and then back again. I could mount the OS X volume in Linux and read from its ~/Public folder. But what if I'm in OS X and want to mount my Linux partition and copy files over from there? I'm SOL, right? Not so fast.
With the install of a couple of tools, MacFUSE and fuse-ext2, you can mount ext2/ext3/ext4 filesystems in OS X. First caveat: I haven't had the guts to write to my Linux partition from OS X. I'm not sure how stable it is and I had no pressing need to experiment. But feel free to be your own guinea pig! That being said, I've had no problems mounting as read-only and copying files from Linux to OS X. So here's a quick how-to.
After you've installed MacFUSE and fuse-ext2, reboot unless you're one of those smartypants who knows you don't have to. I didn't want to find out if I was wrong, so I wimped out and rebooted. This is already going off on a tangeant. I'm also being distracted by pianobar running on Tiger (more on that later). I'll try to be better.
Anyway, once all that's done, fire up Terminal.app and create a new directory in your /Volumes folder with this command:
(UPDATE: For some reason the folder disappears on me after reboot. I can just create it again as needed, but I don't know why it does this.)
I named mine /Volumes/Linux, but you can choose your own. Then you want to find out the identifier of your Linux partition. So run
Obviously replace disk0s5 and Linux with your own particulars. Only there's a bit of a problem here. In Tiger, and I think this is only an issue in Tiger, when you open /Volumes/Linux in the Finder, the folder disappears. Rather vicious bug, but you can still access it in the Terminal with standard commands like ls, cd, and cp, etc.
Also, the above mount command is read-only. If you want to try read/write and see how that goes, add "-o force" to the command.
Unmounting is a simple
If you want the reverse, say total access to your OS X volume while booted in Linux, that involves a couple of issues. First, it'll be read-only unless you disable journaling in OS X. You also won't have access to OS X's home folder (except ~/Public) due to permissions issues. You can read all about how to get around that here and here. I haven't gotten around to experiencing this firsthand, so I'll farm it out to those links. Have fun!
With the install of a couple of tools, MacFUSE and fuse-ext2, you can mount ext2/ext3/ext4 filesystems in OS X. First caveat: I haven't had the guts to write to my Linux partition from OS X. I'm not sure how stable it is and I had no pressing need to experiment. But feel free to be your own guinea pig! That being said, I've had no problems mounting as read-only and copying files from Linux to OS X. So here's a quick how-to.
After you've installed MacFUSE and fuse-ext2, reboot unless you're one of those smartypants who knows you don't have to. I didn't want to find out if I was wrong, so I wimped out and rebooted. This is already going off on a tangeant. I'm also being distracted by pianobar running on Tiger (more on that later). I'll try to be better.
Anyway, once all that's done, fire up Terminal.app and create a new directory in your /Volumes folder with this command:
mkdir /Volumes/your_folder_name(UPDATE: For some reason the folder disappears on me after reboot. I can just create it again as needed, but I don't know why it does this.)
I named mine /Volumes/Linux, but you can choose your own. Then you want to find out the identifier of your Linux partition. So run
diskutil list and you should see your Linux partition among the output. The right column gives the identifier, in my case disk0s5. Now with that handy info you can mount your Linux partition with:sudo fuse-ext2 /dev/disk0s5 /Volumes/LinuxObviously replace disk0s5 and Linux with your own particulars. Only there's a bit of a problem here. In Tiger, and I think this is only an issue in Tiger, when you open /Volumes/Linux in the Finder, the folder disappears. Rather vicious bug, but you can still access it in the Terminal with standard commands like ls, cd, and cp, etc.
Also, the above mount command is read-only. If you want to try read/write and see how that goes, add "-o force" to the command.
Unmounting is a simple
sudo umount /Volumes/Linux.If you want the reverse, say total access to your OS X volume while booted in Linux, that involves a couple of issues. First, it'll be read-only unless you disable journaling in OS X. You also won't have access to OS X's home folder (except ~/Public) due to permissions issues. You can read all about how to get around that here and here. I haven't gotten around to experiencing this firsthand, so I'll farm it out to those links. Have fun!
Sunday, June 2, 2013
Getting a Usable Trackpad on an Aluminum Powerbook in Debian
(UPDATE: In Debian Jessie, my trackpad performs much better.)
I got an aluminum Powerbook off eBay since I decided using a Sawtooth manufactured 13 years ago as my everyday computer was sad, and that a Powerbook from 2006 would be slightly less sad. Actually, all the other choices were even less palpable. Maybe I'll write a post about why decided to stick with PowerPC, but for now I wanted to focus on one thing. After putting Debian on my Linux partition and booting into it, wow did this trackpad suck. Like slow as molasses. And it wasn't a hardware problem. It worked perfectly in OS X. After doing a bit of googling, I found out it's a common problem among Powerbooks from 2005-2006 and the solution is in configuring the synaptics driver.
So here's what you do. First, you should already have the driver, xserver-xorg-input-synaptics, installed as part of the Xorg meta package. Next, you want to open Leafpad or whatever text editor you have and paste the following in a new file:
These settings give you left-click tapping, vertical two-finger scrolling, and locked dragging where you have to click again to release the drag. The FingerLow and FingerHigh values are very low to compensate for the initial (non) sensitivity of my trackpad. If this is too sensitive for you, you can up the values to 10 and 30, respectively, or higher. You can also look up
Next, save the file as synaptics.conf and create a new folder with:
Finally, copy the synaptics.conf file into the newly created folder with:
Now when you restart your X session your new settings should be in effect. In my case it's made for much smoother scrolling, though still not as good as on OS X. Occasionally the trackpad is non-responsive and I have to wake it up with an extra swipe or two.
Another issue specific to these Powerbooks is the keyboard backlight. Via the MintPPC forum, you need to put i2c-dev into /etc/modules and after reboot your keyboard backlight keys should work. Easy.
I got an aluminum Powerbook off eBay since I decided using a Sawtooth manufactured 13 years ago as my everyday computer was sad, and that a Powerbook from 2006 would be slightly less sad. Actually, all the other choices were even less palpable. Maybe I'll write a post about why decided to stick with PowerPC, but for now I wanted to focus on one thing. After putting Debian on my Linux partition and booting into it, wow did this trackpad suck. Like slow as molasses. And it wasn't a hardware problem. It worked perfectly in OS X. After doing a bit of googling, I found out it's a common problem among Powerbooks from 2005-2006 and the solution is in configuring the synaptics driver.
So here's what you do. First, you should already have the driver, xserver-xorg-input-synaptics, installed as part of the Xorg meta package. Next, you want to open Leafpad or whatever text editor you have and paste the following in a new file:
Section "InputClass"
   Identifier   "Touchpad"
   MatchIsTouchpad   "yes"
   Driver   "synaptics"
   Option   "SHMConfig"              "true"
   Option   "MinSpeed"               "0.3"
   Option   "MaxSpeed"               "1.0"
   Option   "AccelFactor"            "0.25"
   Option   "LeftEdge"               "0"
   Option   "RightEdge"              "950"
   Option   "TopEdge"                "0"
   Option   "BottomEdge"             "645"
   Option   "FingerLow"              "3"
   Option   "FingerHigh"             "7"
   Option   "TapButton1"             "1"
   Option   "TapButton2"             "0"
   Option   "TapButton3"             "0"
   Option   "VertTwoFingerScroll"    "1"
   Option   "HorizTwoFingerScroll"   "0"
   Option   "LockedDrags"            "1"
EndSection
These settings give you left-click tapping, vertical two-finger scrolling, and locked dragging where you have to click again to release the drag. The FingerLow and FingerHigh values are very low to compensate for the initial (non) sensitivity of my trackpad. If this is too sensitive for you, you can up the values to 10 and 30, respectively, or higher. You can also look up
man synaptics for all the options and also synclient -l for a list of your defaults.Next, save the file as synaptics.conf and create a new folder with:
sudo mkdir /etc/X11/xorg.conf.dFinally, copy the synaptics.conf file into the newly created folder with:
sudo cp /path/to/your/synaptics.conf /etc/X11/xorg.conf.d/synaptics.confNow when you restart your X session your new settings should be in effect. In my case it's made for much smoother scrolling, though still not as good as on OS X. Occasionally the trackpad is non-responsive and I have to wake it up with an extra swipe or two.
Another issue specific to these Powerbooks is the keyboard backlight. Via the MintPPC forum, you need to put i2c-dev into /etc/modules and after reboot your keyboard backlight keys should work. Easy.
Tuesday, May 28, 2013
Cool Screenshots
Reader Eric H sent me these screenshots I thought I'd share. They're of Debian/MintPPC Wheezy on an iBook G3 600 MHz with custom theming. Very cool.


Also, MacRumors poster Wildy left an update on a Crunchbang-like port for PowerPC, hopefully to be released later this summer. Screenshot is here.
So put one of these distros on your 'book, take it to a coffeeshop, and get ooos and ahhhs.


Also, MacRumors poster Wildy left an update on a Crunchbang-like port for PowerPC, hopefully to be released later this summer. Screenshot is here.
So put one of these distros on your 'book, take it to a coffeeshop, and get ooos and ahhhs.
Tuesday, May 14, 2013
Finder Alternative for Linux
I sometimes meander on the web a bit and read Linuxy things that are mostly over my head, and when I read about qt vs. gtk and how qt was the future, I suddenly decided I hate, no, despise, gtk apps. I don't know what triggered this sudden insatiable need to minimize the gtk look from my life, but here it is. Maybe it has to do with using a couple of qt apps like LMMS and Hydrogen, which just look and feel more professional. I also had a brief misadventure burning a CD and couldn't bear to look at another half-assed GUI, so I installed a couple of command line tools to solve my problem. And I got to thinking, I should be going to the command line a lot more. There's something about it that's more fun. So I went down a list in my head of all the programs I could use in a terminal instead of a GUI when I came to file managers. I'd been using PCManFM and Thunar and was never totally satisfied with either, plus I was growing to hate that gtk three-pane look. So I thought, "I'll just do it all in a terminal and brush up on my rm -rf / commands" (joke--don't run this). But then I remembered another file manager, ROX-Filer, that I wanted to take another look at.
I used it once before, but I guess it was a little too eccentric to take an immediate liking to. Eccentric in that it wasn't like all the other Linux file managers, but on a second spin it reminds me of something from the past. If you ask, "The Mac OS Finder?" give yourself a prize! Look at the screenshot below and you'll see ROX-Filer values the same simplicity.
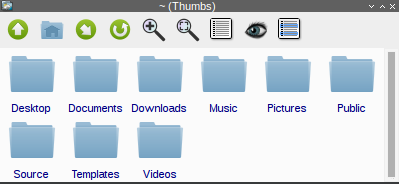
Ironically, I guess, it's a gtk app, but it has a very minimal look with no menu bars or double or triple panes and borders that look like they were made by grade school students. And there's one more thing you get with this minimalism--speed. ROX-Filer is fast. When opening the first time, it's fast. When opening multiple windows, it's fast. When loading hundreds of jpeg thumbs, it's fast. It leaves PCManFM and Thunar in the dust and brings back the feeling of the old Finder.
I've quickly grown accustomed to navigating in it. You can open new folders in the same window much like the OS X Finder, and you can also open folders in new windows with middle-click (Note that ROX-Filer is set to open folders/files with single-click by default, and if you change it to double-click, using middle-click to open folders in new windows doesn't appear to work. You instead have to right-click and choose New Window from the options.). Another useful item is the bookmark toolbar icon (the diagonal arrow button in the screenshot, your icons may differ). Here you can set bookmarks for all your commonly accessed folders, including /media/cdrom0 which is where your mounted CDs and DVDs are.
The only thing I didn't like was MIME types weren't automatically set, so to launch a file you have to set the run action manually for each file type the first time, though after that you don't have to worry about it. Maybe it's different if you're running a proper desktop environment and not pure Openbox.
All in all I'm liking it, and it'll probably save me one day from accidentally erasing my hard drive ;)
I used it once before, but I guess it was a little too eccentric to take an immediate liking to. Eccentric in that it wasn't like all the other Linux file managers, but on a second spin it reminds me of something from the past. If you ask, "The Mac OS Finder?" give yourself a prize! Look at the screenshot below and you'll see ROX-Filer values the same simplicity.
Ironically, I guess, it's a gtk app, but it has a very minimal look with no menu bars or double or triple panes and borders that look like they were made by grade school students. And there's one more thing you get with this minimalism--speed. ROX-Filer is fast. When opening the first time, it's fast. When opening multiple windows, it's fast. When loading hundreds of jpeg thumbs, it's fast. It leaves PCManFM and Thunar in the dust and brings back the feeling of the old Finder.
I've quickly grown accustomed to navigating in it. You can open new folders in the same window much like the OS X Finder, and you can also open folders in new windows with middle-click (Note that ROX-Filer is set to open folders/files with single-click by default, and if you change it to double-click, using middle-click to open folders in new windows doesn't appear to work. You instead have to right-click and choose New Window from the options.). Another useful item is the bookmark toolbar icon (the diagonal arrow button in the screenshot, your icons may differ). Here you can set bookmarks for all your commonly accessed folders, including /media/cdrom0 which is where your mounted CDs and DVDs are.
The only thing I didn't like was MIME types weren't automatically set, so to launch a file you have to set the run action manually for each file type the first time, though after that you don't have to worry about it. Maybe it's different if you're running a proper desktop environment and not pure Openbox.
All in all I'm liking it, and it'll probably save me one day from accidentally erasing my hard drive ;)
Monday, May 6, 2013
Debian Wheezy Goes Stable
I just noticed Debian Wheezy went stable a couple of days ago. I can't believe I missed all those wild and crazy release parties.
Subscribe to:
Posts (Atom)


