Showing posts with label Linux. Show all posts

Thursday, July 21, 2016

Getting Linux on an iLamp iMac with Nvidia Graphics

ILamp iMacs (G4s) are maybe the most notoriously difficult Macs to get a Linux desktop on, mostly because of the GeForce graphics they were afflicted with came with. Since I don't have one and haven't tried to put Linux on it myself, I haven't posted anything about it, but PPC Luddite reader Gary R. via email shared a very concise set of instructions on how to get Ubuntu running on his, so I thought I'd post it here.

Here I quote Gary very liberally:
This is how I got Ubuntu to work:

Download Ubuntu 16.04 minimal install iso for ppc.

Install system utilities and Ubuntu Mate

When finished, reboot

At yaboot type: Linux nomodeset single

When you reach root, type: visudo

Below: root ALL=(ALL:ALL) ALL type: username ALL=(ALL:ALL) ALL (as per your instructions)

Hit Control o, hit return, then exit

nano /etc/modprobe.d/blacklist-framebuffer.conf

comment (#) nvidiafb, uncomment vesafb

write, save, exit

nano /etc/modules, add nvidiafb

write, save, exit

nano /etc/initramfs-tools/modules, add nvidiafb

write, save, exit

update-initramfs -u

nano /etc/X11/xorg.conf and add:
Section      "Screen"
     Identifier   "Default Screen"
     Monitor     "Default Monitor"
     Device      "Configured Video Device"
     DefaultDepth 16
EndSection
write, save, exit

nano /etc/yaboot.conf and add to the append lines to read "quiet splash video=offb:off nomodeset single"

write, save, exit

ybin -v

Type "passwd" and add a root password

Reboot

You should come to a screen that says "Enter root password for maintenance or Control D to continue"

Hit Control D and you should get the Ubuntu Mate desktop
And scene. Gary adds he has to boot into rescue mode as it seems necessary with the nvidiafb and it's the only way to have shutdown, suspend, and reboot working properly. He also likes MATE, and after playing with the latest release on my Debian Sid install, I like it, too. So there.

Thanks again to Gary R.

Thursday, October 22, 2015

More Randomish News

People tell me things...

Via reader Ed, a new version of OpenBSD is out with improved PowerPC and G5 stability and performance. I don't know much about OpenBSD, but don't let that stop you ;)

Also, Hack 5190 at MacRumors' PowerPC Forum dropped news of a new version of the Flash hack that has the old 10.1 plugin spoof itself as the latest v19. This should be useful to those of you using Cameron Kaiser's SandboxSafari.

In case you missed it, the PowerPC Hub just celebrated its fourth birthday with a video.

At the Ubuntu forums, I saw this Radeon UMS thread for users who need to disable KMS and can't get acceleration because the Radeon driver dropped UMS support. The new UMS-enabled debs are for Ubuntu 14.04, but just for giggles I tested them on Debian and they worked! I just had to install libgcrypt11 1.5.3 in addition to the debs provided--the libgcrypt11 in Debian was too old.

Finally, Apple's ruse to release El Capitan as x86 only to reveal it was PowerPC all along is up:

Spotify 1.0.8 on El Capitan detected as a PowerPC app

Nice try, Apple. If it weren't for those meddling kids!

Thursday, August 13, 2015

Debian Kernel With Sound Fix

(UPDATE: The original version of this post had typos in the symlinks below. They have been corrected.)

Following up on my last post where I mentioned compiling a custom kernel to test sound patches, I can report the patches worked and those of you who have been suffering from that nasty soundcard detection failure will have restored sound in, I believe, the 4.2 kernel. However, if you don't want to wait that long, I'm making available the patched Jessie kernel I compiled on my Sawtooth (download link at bottom).

Actually, the first kernel I compiled was on my G3 iBook, but I compiled it without Altivec instructions, so that would be kind of useless to G4 owners. So I compiled another one on the Sawtooth (I didn't want to risk melting my iBook again), and it works fine on all three systems I've tried it on (G3 iBook, G4 Sawtooth, and G4 Powerbook). It's compiled with all the stock options; the only modifications are the two patches, this one applied on top of this one, that fix the sound bug.

So after you download it, open a terminal and use the cd command to change to your downloads directory:

cd ~/Downloads

Then install the kernel with:

sudo dpkg -i linux-image-3.16.7-ckt11-soundfix_1.0_powerpc.deb

Then to set it as your default kernel, create these two symlinks:

sudo ln -s /boot/initrd.img-linux-image-3.16.7-ckt11-soundfix /boot/initrd.img.soundfix
sudo ln -s /boot/initrd.img-3.16.7-ckt11-soundfix /boot/initrd.img.soundfix


sudo ln -s /boot/vmlinux-linux-image-3.16.7-ckt11-soundfix /boot/vmlinux.soundfix
sudo ln -s /boot/vmlinux-3.16.7-ckt11-soundfix /boot/vmlinux.soundfix


Then edit /etc/yaboot.conf, adding this kernel entry on top of the others:
image=/boot/vmlinux.soundfix
     label=soundfix
     read-only
     initrd=/boot/initrd.img.soundfix
Listing it first will keep it as your default kernel even after a software update installs a newer kernel. Conversely, if you're through with it being your default, list it somewhere other than first. As always when changing yaboot.conf, run sudo ybin -v to update the configuration.

Now using this very unofficial kernel brings up thorny security issues: how can you trust it, how do you know it doesn't have malicious code, etc. However, in the years I've written this blog, I think I've established that

a) I'm reasonably trustworthy.
b) I totally lack the skills to pull something like that off.

So install with no worries :)

Here's the download and sha256 fingerprint:

http://www.mediafire.com/download/cj8h2h4dybg2otm/linux-image-3.16.7-ckt11-soundfix_1.0_powerpc.deb

sha256: f489a9d2c617fa803bbe44c7913a4540b1705ab3e6da6b149559bddcb3b508ff

Saturday, April 19, 2014

Integrate Rox-filer With Your Openbox Desktop

Awhile back I wrote about Rox-filer and I promised to augment that post with another detailing how to integrate it with your Openbox desktop, and right on schedule I'm here to do that now, several months later. Why Rox-filer, you ask? Besides being lightning quick, it's also somewhat similar to the old Mac OS 9 Finder so it brings back a bit of that Mac feel to your computer. It has its quirks and it takes a little extra work to set up things like desktop icons, mounting external devices, and integrating it with your Openbox menu, but it shouldn't take long with clear and well-articulated instructions. Okay, I can see your ironically raised eyebrows, but remember, this blog is free ;-)
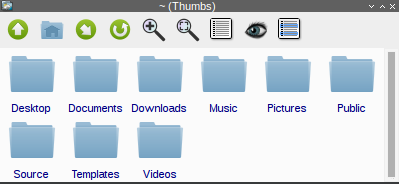
Desktop Icons

Let's start with desktop icons. Rox has a Pinboard function that allows it to draw the desktop background and enable dragging and dropping icons onto it. It's not quite like other file managers where you drag and drop and the files get moved to the Desktop folder. Instead, dragging and dropping creates an iconified link on your desktop. The actual file remains in its original location.

So first you go into Rox's preferences by right-clicking on a Rox window and selecting "Options." Then click the "Desktop" section and make sure "Pinboard only" or "Panel and Pinboard" is selected (the Rox panel is somewhat gauche and ugly so I won't use it here). Next, in a terminal enter "rox --pinboard=MyPinboard" ("rox --pinboard=" with nothing after the equal sign conversely kills it). Here your desktop should turn a dull grey, because Rox is now painting your desktop. To get back your wallpaper, right-click on the desktop and choose "Backdrop..." and drag and drop your wallpaper file to the popup window. If you're wondering where your Openbox menu went, don't be alarmed. Go back into Rox's preferences, and in the "Compatibility" section click "Pass all backdrop mouse clicks to window manager." This gives you your Openbox menu back.

So now that you have it all set up, you can drag files (and applications) to your desktop. These are launchable icons that are right-clickable to bring down extra options, including removal. There are other options in the preferences for fine-tuning including choosing your icon theme, so make use. Once you're satisfied, you can put the command "rox --pinboard=MyPinboard" in your autostart file (don't forget the "&" at the end if it's an Openbox autostart file).

Mounting Drives

Now let's move on to mounting external media. It's easy for optical discs. You just open the mount point in Rox (/media/cdrom0 on Debian) and it automatically mounts. You can set the mount point as a Rox bookmark or add a pipe menu in your Openbox menu (more on that below) for shortcuts. Mounting external drives is basically the same, but they need unique entries in /etc/fstab for something called static mounting. At least you only have to do it once ;-)

(EDIT: Thanks to a tip in comments, you can automount any external media with udisks-glue. The steps are: install udisks-glue, then add "udisks-glue &" without quotes to ~/.config/openbox/autostart, and that's it! When you login again, your external drives will automount in /media. So with that you can probably disregard the next four paragraphs until you get to the pipe menus section. And on the subject of pipe menus and udisks-glue, take a look at obdevicemenu.)

First, create a mount point in /mnt with sudo mkdir /mnt/name of your drive. Next, you want to get the UUID (universally unique identifier) of the device by plugging it in and entering in a terminal sudo blkid /dev/sdb1. Or it may be sdc1 if you have two internal drives taking up sda and sdb. You'll know when you plug in the device with your /dev directory open. Just see what gets added, sdb1 or sdc1, whichever. The "1" at the end refers to the first partition, so if you're attaching, say, a Mac in Target Disk Mode, you'll likely enter sdb3 because OS X system partitions are usually the third on a disk.

Once the blkid command reveals your UUID (and your file system under "TYPE"), create a new line in /etc/fstab that looks something like this (all on one line):

UUID=5956-17FF /mnt/FLASH_DRIVE vfat user,noauto,noatime,nofail,rw,flush 0 0

That's for my thumb drive. The "vfat" is its file system, the flush option is specifically for vfat file systems, and the nofail prevents failure messages at boot when the drive might not be attached. For non-thumb drives you may want user,noauto,noatime,nofail,rw,defaults.

Now to mount when you attach it, just open the mount point for that specific drive in Rox and it mounts. Unmounting should work by closing the folder and getting a dialog, but if it doesn't you can right-click on the folder and choose the unmount or eject options. And you can create bookmarks of your mount points for shortcuts, too.

Pipe Menus

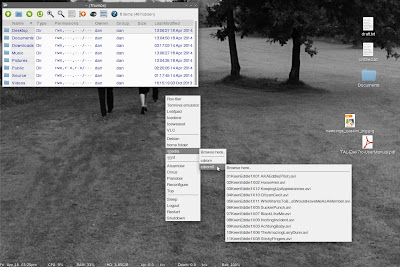
I mentioned earlier you can add shortcuts in your Openbox menu in the form of pipe menus. With pipe menus, you can browse the contents of your home folder from right inside your Openbox menu and launch files or choose a folder to open in Rox. You can also open mount points to mount devices.

This involves getting a script file and adding entries to Openbox's menu.xml that call the script and create the pipe menus. So first go to this Archbang wiki page and copy and paste the contents of the script into a new file. You just need to make one change. Where it says "spacefm", change it to "rox-filer" or whatever your file manager is. Save it as obpipemenu-places and make it executable with sudo chmod a+x.

Next, add the correct entries to ~/.config/openbox/menu.xml, placing the entries in the file where you want them to appear in the menu. Mine look like this:

<menu execute="/home/dan/Source/scripts/obpipemenu-places" id="browse" label="home folder"/>

<menu execute="/home/dan/Source/scripts/obpipemenu-places /media" id="browse2" label="media"/>

<menu execute="/home/dan/Source/scripts/obpipemenu-places /mnt" id="browse3" label="mnt"/>


Save the file, then choose Reconfigure from your Openbox menu (or openbox --reconfigure from the terminal) and you should see something like this:

Openbox and Rox

One more note on integration, Roxterm has a lot of drag and drop compatibility with Rox-filer, similar to the Finder and Terminal.app in OS X.

Bugs/Workarounds

You didn't think all this would be bug-free, did you? There are a couple of conflicts with Conky I can point out. First, right-clicking the desktop may cause your Conky output to blink. Since this is annoying, you can stop it by going into the "Compatibility" section in the preferences and select "Override window manager control of the pinboard and panels." Also, Conky transparency doesn't play well with Rox's pinboard. It'll show a black background on your Conky window. This might not be apparent at first if you have your previous wallpaper program running, but when you kill it and just have Rox drawing your desktop, you'll see it. The solution is to have both wallpaper programs running simultaneously, oddly enough. I use feh, which is low resource, anyway.

I also found a window focus bug. When I open a Rox window with the Pinboard running, the first click on the window unfocuses it, or if I first right-click on it, it brings down the Openbox menu as if I were clicking on the desktop. This is also annoying. To fix it, go into Rox's preferences, in the "Compatibility" section, and deselect "Pass all backdrop mouse clicks to window manager." But now you can't bring down your Openbox menu, right? Well, you can do it with a keybinding. I actually prefer this instead of hunting for an open space on the desktop to right-click on. Rather, you just hit a key combo wherever your cursor happens to be. To set a keybinding, edit your ~/.config/openbox/rc.xml by inserting the following into the <keyboard> section where all the keybindings are:

<keybind key="W-KP_Enter">
  <action name="ShowMenu"><menu>root-menu</menu></action>
</keybind>

The "W" in "W-KP_Enter" refers to the Windows key (Apple key on Apple keyboards) and "KP_Enter" is the Enter key (on the bottom row on laptops, or on the keypad on extended keyboards). Or you can delete the "W-" part and just have the keybinding be Enter. Looking at the other keybindings, you'll see that "S" refers to Shift, "C" is Control, and "A" is Alt. You can look up the other keys with the xev command, such as the spacebar being "space".

Finally, files and folders with ampersands, apostrophes, and possibly quotes, in their names will fail to open in the above pipe menu, so you can just modify the names (yes, I found out when my Guns N' Roses folder failed to open).

I think that about covers it. Oh, wait, I forgot setting up default applications. That can be done with the "Set Run Action..." menu item when right-clicking on a file. Drag and drop your chosen application's .desktop file from /usr/share/applications into the popup window, and you're all set.

You can also add an "Open With..." function, only in Rox it's called "Send To..." To add applications to your "Send To..." menu, right-click a file, select "Send To..." and then "Customize" and it'll open a folder at ~/.config/rox.sourceforge.net/SendTo to drag and drop symlinks from /usr/share/applications into. To drop a symlink, choose "Link (relative)" from the resulting menu. You can also divide the applications by file type by adding hidden folders like .text, .image, and .video into the SendTo folder and dragging the proper symlinks into their respective folders. You should rename the symlinks to get rid of the ".desktop" at the end. Now you should see a menu of applications popup when you click on "Send To..." :-)))

You're still here? Go. Go home.

Ferris Bueller

Sunday, December 22, 2013

Shhh... Go ahead. You throttle that CPU.

Lately I got sucked into looking at methods to throttle CPUs on PowerPC. It started out as a good idea, but my compulsion for completeness made it take on a life of its own and I probably spent way more time reading about it than necessary. But I've come out the other side, and now I'm reading a 580 page book about the Crimean War! Totally useful knowledge. I know how to pick 'em. Anyway, the point of all this is I am now here to share the fruits of my labor and tell you exactly why Orthodox religion and rampant Russophobia in Western Europe led to... I mean, tell you all the ways you can throttle your Mac's CPU.

Throttling CPUs often gets confused with the nice/renice commands, but they aren't quite the same. Nice/renice only prioritizes processes eating your CPU, but all your idle CPU will still be used. CPU throttling actually limits the amount of CPU a process can use. For example, if you throttle Handbrake to 50% CPU, Handbrake won't rise above 50% usage even if there are no other processes running. The practical use for this is mostly for laptops. Let's say you're doing some compiling or video encoding, something CPU intensive that takes a long time, but your laptop easily overheats or you just don't want to hear the fan going. You can limit the heat by throttling the CPU. Sure, it'll take longer, but your laptop won't give you Toasted Skin Syndrome.

For our PowerPC Macs I found a few ways of doing this, all from the command line. First, on Linux there's a program called cpulimit which has you enter a process name or PID number and the percentage of maximum CPU you want to set it to. A typical command would look like this:

cpulimit -e iceweasel -l 50

The "-e" is used when you enter the name of the program (iceweasel). You use "-p" when entering the PID instead, and you can also use -P to enter the absolute path (/usr/bin/iceweasel). The "-l" is for limit, and the 50 is the max percentage of CPU allowed. To exit, just use the standard ctrl-C.

For OS X, I found a couple of ways that work in Tiger. First, there's cpulimitrob. This is a script that someone left on Mac OS X Hints and does essentially what cpulimit does. It uses SIGSTOP and SIGCONT to pause and restart, thereby limiting total CPU time. After you download it and give it the customary chmod kiss (755), you change directories to its current location with the cd command and fire it up as root:

~ dan$ cd Development

~/Development dan$ sudo ./cpulimitrob.sh
Password:
Which process ID (PID)?
297
Sleep time in seconds?
.5
Run time in seconds (e.g 0.5 or 1 ?)?
.5
.................


and the dots continue on and on until you exit with ctrl-C. It mostly works well. The only hitch I found was when testing with TenFourFox, where the browser froze whenever I exited cpulimitrob in the middle of a page loading.

The other tool I found for Tiger didn't have any such problems and appears to exit more gracefully. It's called cputhrottle. However, the binary available for download isn't compiled for PowerPC, and to compile requires Boost 1.33.1. So being the completist that I am, I installed Boost with Tigerbrew (about 3-4 hours to configure and make) and then compiled cputhrottle from source. Using cputhrottle is almost the same as cpulimit, though like cpulimitrob, you need to run it with the sudo command:

~ dan$ cd Development/cputhrottle

~/Development/cputhrottle dan$ sudo ./cputhrottle 1309 50


The 1309 is the PID which you can get from top or Activity Monitor, and the 50 is the max CPU percentage. And again, killing the limit is as simple as ctrl-C.

In case you don't want to compile Boost and cputhrottle, I uploaded the binary I made to my Mediafire folder. It should work on Tiger, though I'm not enough of a compiling expert to say definitively whether it'll work on Leopard. You may also need to run "chmod +x cputhrottle" to make it executable.

Finally, if you just want to prioritize your processes so web browsing or somesuch isn't super slow while something else hogs the CPU, you don't have to use nice/renice from the command line. There's a very old GUI application for OS X called ProcessWizard that still works. In Linux, you can do the same with Gnome System Monitor.

Sunday, November 10, 2013

Ladies and Gentlemen, Your iTunes Killer

As long time readers may know, I've been on a never-ending quest to find a music player that I like, or to put it another way, that I don't actively dislike. I mostly stuck it out with iTunes over the years, having found the alternatives lacking. This hasn't been a problem in Linux where there's much more choice, including the excellent Audacious, but in OS X things are a bit more constricted.

I did switch to Cog more recently, and I think I wrote about it, too. The deal breaker previously was its lack of an equalizer, but since I found how to enact a global equalizer, I switched. Still, though, Cog didn't support radio streaming and I had to rely on Mplayer from the command line or go back to iTunes for that feature.

Was this the end of the road? Was I to be forever denied local playback and internet streaming in one appealing package? Would I ever find audio nirvana?

Well, I have found my nirvana and it is called CMus.

CMus music player

That's right, CMus is a console player. No mouse, just key commands. It plays mp3, ogg vorbis, flac, aac, the works, and also streams internet radio. And for icing on the cake, it's cross platform. On both Linux and OS X, you just use your package manager to install, so if you're on OS X you'd use either Macports or Tigerbrew.

After installing, the easiest way to get started is by pressing 5 for the browser pane and navigating to your Music folder. Press "a" to add the songs to your library and then press 1 to go to your library in tree view (press 2 for your library in list view). Press return to start playing, or use the arrow keys to choose the artist, the spacebar to expand the albums tree, and then tab to switch the active cursor to the album pane.

To add a radio station to your library, type ":" without quotes to activate the command line section, then "add http://..." and press return. It should be the first item in your library, called "<Stream>". Alternately, you can use the browser pane to navigate to any .m3u files on your hard drive and add them with the aforementioned "a".

The resources CMus uses are practically nonexistent. It's also very fast to load libraries and playlists, and speed is the main advantage of console programs such as this. The downside is that they can be hard to master with many key commands to memorize, but music players aren't all that complex when you get down to it. Mostly, you play, stop, pause, skip, and shuffle, etc. After a quick read of the manual, I got the hang of it in about a minute.

I don't think I'll go full-on frugal computing and start using console apps for all my needs, but in case you're inclined to explore that option there are tons of console alternatives to your GUI apps. There's Alpine and Mutt for email, ELinks for web browsing, also Floodgap's more famous software title, TTYtter, as well as LFTP, SLRN, Pianobar, and more. If you use the functionality of any of these often, you should take a look. You might find yourself surprised.

Thursday, October 24, 2013

Changing Color Temperature in Linux

Color calibration has never really been a problem on Macs with built-in monitors like iMacs and 'Books of various sorts. Naturally, since they make both the hardware and software. The picture is bright, and the colors are warm and vibrant. The same can't be said, though, when you introduce anything non-Apple into the mix like a third-party external monitor, or booting into Linux. In those cases, the default color temperature tends to look too blue, too cool.

If you have an external monitor, that isn't a problem as you can just reach up and adjust the color temperature manually on your monitor's controls, but if you're booted into Linux and you're on an iMac or a laptop, you don't have that option. You need a software solution, and as chance has it, there is one. It's called Redshift, and it's a cool little command line utility that was originally intended to adjust the color temperature of your screen according to the time of day, but there's also a "one shot manual mode" that lets you adjust once to a permanent setting.

To change your screen's color temperature, you just need to type one simple command:

redshift -O colortemperature

where colortemperature is a number in Degrees Kelvin (the default seems to be 6500). Also, the -O is capital O, not zero. So if your iMac or laptop screen is too cool, try lowering the temperature number a little, to say 6200, for a slightly warmer picture. On my iBook, I eventually settled on 6250. An easy way to calibrate your screen correctly is to hold up a Macintosh laptop booted into OS X next to it and make them match.

Now put that command in your autostart file or a startup script and you're good to go.

I've written before about Xgamma which I used to adjust the gamma level, and I also tried it for warming up the screen by adjusting the red, blue, and green levels separately, but I could never get it quite...right. So Redshift really comes to the rescue here.

Also monitor related, if you're using an external monitor connected to your laptop, I discovered a simple GUI front end for xrandr called LXRandr.


So if you were trying to deal with xrandr from the command line to put your laptop display to sleep and set the resolution for your external monitor, this significantly simplifies things.

Sunday, September 29, 2013

Sync Files Across Your Macs With Unison

Awhile ago I wrote about Bittorrent Sync, basically your own bittorrent network for syncing your files on your home network. I wrote about it because they included a PowerPC binary with their Linux downloads, but unfortunately their OS X client required Intel so if you wanted to use this on your PowerPC Macs, they all had to be running Linux.

This left me still out to sea. I use a mix of Tiger and Debian machines, so Bittorrent Sync ultimately wasn't for me (it's also closed source and unavailable for security auditing). So having tired of SFTPing my files around and expending brain power to keep all the versions straight, I went looking for another option, one like Bittorrent Sync where I could sync on my home network and without involving the cloud.

At first I looked at rsync, venerable I guess you'd call it, not old :), but that offers mirroring, not two-way syncing. Finally I stumbled upon Unison, an rsync-like utility that's exactly what I need, two-way syncing, and it's multi-platform--Windows, Linux, OS X, everything.

You can get Unison in command line form or as a GUI. The command line can be installed with Macports or Tigerbrew on OS X and is in the Debian repositories. Debian also has the GUI, unison-gtk. Does that leave OS X out of the GUI party? No sirree. Universal binaries for Tiger and Leopard have been made available here, and the thing to note is you need the same version on all computers. Meaning if you install 2.32 on Tiger from the previous link, you also must have 2.32 on every other system you're syncing with. Fortunately Debian makes multiple version available for just this situation, so now I have 2.32-12 on my Tiger laptop and 2.32-52-gtk on my Jessie system (the 12 and 52 don't matter).

Using Unison is as simple or as complex as you want it. You can start by using the GUI app and then graduate to the command line for more complex operations which you can automate with cron jobs. But for now I'll give you a quick rundown of getting started with the GUI.

First, it's recommended you copy the folders you want to sync over to your target computer so you start out with identical folders. Then you start up the Unison GUI and create a profile. Here's an example for syncing my Tiger home folder with my Debian home folder on an iBook:

Unison profile on OS X

About the "Remote" part, note this is all done over SSH, so make sure you have Remote Login enabled in your OS X Sharing Preferences or have openssh-server running on Linux. Also note that SSH gives you rock-solid security (unless your password is "password"). For "Host", it could be xxx.xxx.x.xxx or your computer's hostname.

Now save it, but say you don't want to sync everything in your home folder. What if you only want Documents, Music, and Pictures synced? You could create a separate profile for each folder or mess around with symlinks, but a much better way is to edit your .prf file to define those paths. In OS X you'll find it in ~/Library/Application Support/Unison, and in Linux it's in ~/.unison. Here's a simple example of my "powerbook to icebook.prf":

# Unison preferences file
root = /Users/dan
root = ssh://dan@icebook.local//home/dan

# folders to sync
path = Documents
path = Music
path = Pictures

# filenames to ignore
ignore = Name .DS_Store
ignore = Name .localized

# save log file somewhere, anywhere but the home
# folder
logfile = /Users/dan/Library/Logs/unison.log


The first three lines were created when we saved the profile in the GUI, but the rest were added. In the second section, I define the paths of the specific folders I want synced (you don't have to write out the full path as the root is already defined in the first section), the third section tells Unison to ignore those hidden .DS_Store and .localized files in OS X, and the last section tells it where to save the log file (the default is your home folder).

The only trouble I had was with spaces in the folder names. Say if I wanted to enter "path = Pictures/vacation photos" it won't work. Adding \ or enclosing with quotes didn't work, either, so the only solution I can think of is to eliminate the spaces in the original folder's name.

The procedure for all this is pretty much identical in the Debian GUI.

So now you want to get your sync on. So you start up Unison, double click your profile and perform the first syncing. Remember, you're starting out with identical folders, so the first sync is just Unison recording what's what. The only thing you have to note is the direction of the arrows. "-->" means local to remote and "<--" means remote to local. Mark all changes by clicking the left-to-right arrow, then click the "Go" button and it should finish shortly. From then on Unison should only transfer the files that have been changed, and only the parts of those files that need updating. That way you're not uploading huge files when you just need to update small parts of them.

This is also really useful for syncing to a USB thumb drive. You wanna minimize the writes, right? When setting up a profile for that, you just use the "Local" option instead of "Remote" and enter the drive's path. There are a couple of cautions for us PowerPC users, though, in syncing to a USB drive formatted as FAT32 (or any OS X to Windows syncing). Unison will give you errors about permissions and resource forks, so you want to add the following lines to your thumb drive profile:

perms = 0
rsrc = false


These will tell Unison to leave out permissions and resource forks. If you need to preserve resource forks, you can compress the file in a .sit container. And one more thing, when syncing make sure your drive is actually mounted, because if it isn't Unison will think the sync folder is empty and will attempt to delete your files. :o

Anyway, here are a few more links for further reading, including all about syncing more than two computers--star topology--and all that. Have fun!

Unison Manual
UNIX/Linux: HowTo Use unison File Synchronizer
File Synchronization with Unison
Unison - ArchWiki

(UPDATE: Note to self, when changing the names of folders, make sure to also change the corresponding folder names in my .prf file. Otherwise much confusion arises.)

Wednesday, September 11, 2013

A Debian Jessie Update

Since Wheezy turned stable, I've been running Jessie on a spare iBook with varying degrees of success/heartbreak, so I figured I'd throw in a progress report for those of you who are curious about upgrading (DON'T!!!!!!!!!!). I keeed.

It's actually been smooth running except for a few very slightly minor bugs. Like sound, for instance. Completely broken. I don't know if this affects every sound card, but mine isn't detected with the new kernel. Also, suspend to RAM has a very slight, minor bug. Also completely broken. I left two bug reports, No sound on PowerPC with Jessie upgrade and Suspend fails on iBook G3 Dual USB PowerPC, in case anyone wants to add to the crickets left by Debian's kernel maintainers.

Both of these problems can be dealt with, fortunately, by an easy workaround. If you upgraded from Wheezy to Jessie, you can boot into the previous kernel (3.2.0-4) by hitting tab at the second yaboot prompt and typing in "old". Afterward, sound and suspend should be back to normal. You can also install the 3.2.0-4 kernel from a clean Jessie install by adding:

deb http://security.debian.org/debian-security wheezy/updates main

(that's a space between debian-security and wheezy/updates, not a carriage return) to your /etc/apt/sources.list. After installing, follow the instructions on the sixth post on this Ubuntu thread about editing yaboot.conf to tell it to boot a specific kernel.

I suppose those problems will be eventually fixed, but with the latest update I saw even worse news. Xserver-xorg-video-radeon was updated to a KMS-only version, meaning if you have a Radeon GPU and don't have KMS activated, it throws it back to the fbdev driver, meaning video playback will suck and you'll only see 8 bit colors. You can fix the 8 bit colors problem by passing the yaboot parameter "video=radeonfb:1024x24-32@60" at start up (replace 1024x768 with your native resolution). This is familiar to anybody who followed zen's guide to installing Lubuntu. However, this won't help you speed up video playback which, as mentioned, sucks with fbdev.

You can always activate KMS with the yaboot parameter "video=radeonfb:off", but there are downsides (along with the upside of enabling 3d). First, KMS breaks suspend on PowerPC and I found no indication work is being done to correct this. Also, your keyboard brightness keys may not work. But worst of all, when I tried enabling KMS on two of my machines, I got a black screen (iBook) and persistant system freezes after boot (Sawtooth). So KMS is totally unusable for me. So how do I get back my fast 2d desktop with decent video playback that I had with the old radeon driver?

(UPDATE: You can greatly improve window-dragging performance by running Compton ["compton -b" to run it as a daemon])

Fortunately you can downgrade select packages. I'm sure there's a more elegant way by using dpkg, but here's my quick and dirty way of downgrading to the previous radeon driver. First, edit your /etc/apt/sources.list and change all the listings from jessie to wheezy. Then do a sudo aptitude update to update the repositories, then switch to a console and kill X with sudo /etc/init.d/yourloginmanager stop, and then (on one line):

sudo aptitude remove xserver-xorg-video-radeon

Aptitude told me it needed to remove two dependencies, xserver-xorg-video-all and xserver-xorg-video-ati as well, so I said fine and proceeded. Next, I reinstalled the drivers using the old wheezy repositories with (one line):

sudo aptitude install xserver-xorg-video-radeon xserver-xorg-video-all xserver-xorg-video-ati

There's one more step and that's to put a hold on the radeon driver, that is, to tell your package manager to keep it at that version and never upgrade it. I found the instructions for that at Not So Frequently Asked Questions, but it's basically:

sudo -s

to make yourself root. And then (on one line):

echo xserver-xorg-video-radeon hold | dpkg --set-selections

and to confirm the new setting:

dpkg --get-selections xserver-xorg-video-radeon

Finally you'll want to revert back to the Testing repositories by restoring your edits to /etc/apt/sources.list and running sudo aptitude update again.

Afterward when I did a full-upgrade to upgrade all my packages, the video-all and video-ati packages were upgraded, which I didn't care about, but the radeon package remained at its old version. Now when you startx or reboot, your desktop should be back to its old snappy self.

I should note here, you should be cautious about putting holds on packages. It's possible you can have a cascading amount of packages held back from upgrades as the dependencies on that original held package build up. But in this case with the radeon package it hasn't been a problem, but it's something to keep an eye on. I just made sure to save a note about how to hold and unhold packages from the above link.

^
^
^
No.

One more snafu you should be aware of, the new gtk-3-0 update will break some themes causing gtk3 applications to quit immediately upon open. I'm not sure this is a bug that will ever be fixed since the problem is supposedly with the themes themselves. So if yours breaks, you can either wait for the theme maintainer to release an update or find a new theme (and given I hate all themes, except one which I find satisfactory but which is now broken, this is an unfortunate burden). --UPDATE: or you could take the gtk-3.0 folder out of your theme folder from ~/.themes and use gtk3 apps without a theme.

I didn't bother downgrading gtk-3-0 because it had too many dependencies. It would've gotten too weird.

^
Looks like this bug is fixed.

So that's where Jessie is. I admit to being discouraged and depressed about it, especially on the graphics side. A few years ago I had this vision of Linux on PowerPC always getting better and better, but with support for older graphics cards being dropped left and right, and now this KMS-only business, it looks like we'll be patching together systems with sticks and chewing gum for the foreseeable future.

Maybe the Debian team can be convinced to realize they found perfection with Wheezy and to maintain it with security updates and backports for like the next ten years, or at least until our PATA hard drives burn out ;)

Tuesday, May 28, 2013

Cool Screenshots

Reader Eric H sent me these screenshots I thought I'd share. They're of Debian/MintPPC Wheezy on an iBook G3 600 MHz with custom theming. Very cool.


Also, MacRumors poster Wildy left an update on a Crunchbang-like port for PowerPC, hopefully to be released later this summer. Screenshot is here.

So put one of these distros on your 'book, take it to a coffeeshop, and get ooos and ahhhs.

Tuesday, May 14, 2013

Finder Alternative for Linux

I sometimes meander on the web a bit and read Linuxy things that are mostly over my head, and when I read about qt vs. gtk and how qt was the future, I suddenly decided I hate, no, despise, gtk apps. I don't know what triggered this sudden insatiable need to minimize the gtk look from my life, but here it is. Maybe it has to do with using a couple of qt apps like LMMS and Hydrogen, which just look and feel more professional. I also had a brief misadventure burning a CD and couldn't bear to look at another half-assed GUI, so I installed a couple of command line tools to solve my problem. And I got to thinking, I should be going to the command line a lot more. There's something about it that's more fun. So I went down a list in my head of all the programs I could use in a terminal instead of a GUI when I came to file managers. I'd been using PCManFM and Thunar and was never totally satisfied with either, plus I was growing to hate that gtk three-pane look. So I thought, "I'll just do it all in a terminal and brush up on my rm -rf / commands" (joke--don't run this). But then I remembered another file manager, ROX-Filer, that I wanted to take another look at.

I used it once before, but I guess it was a little too eccentric to take an immediate liking to. Eccentric in that it wasn't like all the other Linux file managers, but on a second spin it reminds me of something from the past. If you ask, "The Mac OS Finder?" give yourself a prize! Look at the screenshot below and you'll see ROX-Filer values the same simplicity.

ROX-Filer

Ironically, I guess, it's a gtk app, but it has a very minimal look with no menu bars or double or triple panes and borders that look like they were made by grade school students. And there's one more thing you get with this minimalism--speed. ROX-Filer is fast. When opening the first time, it's fast. When opening multiple windows, it's fast. When loading hundreds of jpeg thumbs, it's fast. It leaves PCManFM and Thunar in the dust and brings back the feeling of the old Finder.

I've quickly grown accustomed to navigating in it. You can open new folders in the same window much like the OS X Finder, and you can also open folders in new windows with middle-click (Note that ROX-Filer is set to open folders/files with single-click by default, and if you change it to double-click, using middle-click to open folders in new windows doesn't appear to work. You instead have to right-click and choose New Window from the options.). Another useful item is the bookmark toolbar icon (the diagonal arrow button in the screenshot, your icons may differ). Here you can set bookmarks for all your commonly accessed folders, including /media/cdrom0 which is where your mounted CDs and DVDs are.

The only thing I didn't like was MIME types weren't automatically set, so to launch a file you have to set the run action manually for each file type the first time, though after that you don't have to worry about it. Maybe it's different if you're running a proper desktop environment and not pure Openbox.

All in all I'm liking it, and it'll probably save me one day from accidentally erasing my hard drive ;)

Monday, April 29, 2013

Sync Folders On Your LAN with BitTorrent Sync

There's a new syncing service and this one's a little different. Have you ever just wanted to sync your folders without involving the cloud? Here's your chance with BitTorrent Sync. As the name suggests, it uses BitTorrent technology to sync any folder across all your PCs and NAS devices on your home network. The only caveat is you need the client running on both computers, and the OS X version requires Snow Leopard, so Tiger and Leopard users are out of luck. So why is this appearing on a PowerPC blog? Because incredibly BitTorrent Labs compiled a PowerPC version for their Linux client. I've used it to sync folders on a MintPPC desktop and a Debian laptop, and though it's still in alpha and doesn't have many advanced features, it worked flawlessly.

Here's how to get it going. First, download the correct version (Linux PowerPC for your PowerPC Macs) and extract it to any directory in your home folder. Then either use your file manager to open that directory in a terminal, or in a terminal type the command cd path to directory holding the btsync binary. Then get the btsync daemon running by entering ./btsync.

Nothing happened. That's 'cause you have to use the web interface, silly! So get your IP address with sudo ifconfig (among other methods), fire up a web browser and go to yourIPaddress:8888/gui. In my case:

192.168.1.105:8888/gui

Next you should see the web interface where you can click Add Folder. Type the path to it, /home/yourusername/whatever, and then click the generate secret button. You will enter that secret into your other computer to sync to that folder. So do the same thing on your other computer. Extract the binary, startup the daemon, bring up the GUI, and add a folder to sync, this time entering the secret from your other computer into the Secret field instead of generating a new one. Now the syncing should start--Snow Leopard users may see a delay of up to ten minutes which BitTorrent Labs implies is strictly the fault of Snow Leopard ;)

I got pretty much full speed out of my wireless connection, though I haven't tested it over ethernet so I'll defer comment. Also, in their Get Started guide, they mention disabling the "Delete files to Sync trash" option means your deleted files will instead go to your system's trash folder, but on my system they just disappeared. So be mindful of that. Also there's no versioning yet, but I'd expect that in the near future. But overall, pretty cool stuff.

Thursday, March 28, 2013

How I Use Linux

What's with all the hostility to Linux on PowerPC? If you've read certain forums or blogs you've probably come across it. Not just, "Linux isn't for me," but attacking Linux as bad for everyone and warning people not to do it. Among those attacks are common complaints like there's no flash, the UI is boring, the hardware is unsupported, etc. First, flash's performance sucks. You can get way more mileage streaming through Mplayer or VLC. Second, the UI is whatever you choose. And third, I don't remember the worldwide sturm und drang when people put out HowTos on how to install Tiger on unsupported hardware with XPostFacto or Leopard with LeopardAssist.

The fact is Linux is not OS X. And OS X is not Linux. One does some things better than the other and vice versa. I run a mixed environment. I have a desktop that primarily runs OS X and a laptop that primarily runs Debian Linux. So I thought I'd compare the two and show you the ways which Linux has helped me.

On OS X my most used applications are TenFourFox, iText Express, iTunes, Mplayer, MacTubes, and Transmission (it's always on in the background. I'm on a private tracker). Incidentally, all of those applications have identical or very-close-to-it counterparts on Linux. I also commonly use Cyberduck, ToyViewer, GIMP, SABnzbd, TenFourKit, and GarageBand. But sometimes it's not enough. One limitation I have is I don't have a widescreen monitor, so it's difficult to play video and do other work simultaneously. That's where my Linux laptop comes in. I use it for streaming media, Youtube, etc., and it has its own dedicated processor so my desktop's doesn't get bogged down playing a webisode of The Guild. It also has Pithos, which is unavailable for OS X, that streams Pandora radio.

Another thing I turn to Linux for is LibreOffice. LibreOffice on OS X is too dog slow (and the Tiger version has monospace font issues Bug fixed), but on Linux it feels almost like a lightweight word processor.

Lately I've been getting my feet wet with music production and trying software synths like Yoshimi and Phasex, and sequencers like LMMS and Qtractor. Some Linux DAWs and synths are more polished than others, but the range of choice is amazing. And as far as music playback goes, I love Audacious's xmms interface and hate that there's nothing like it on OS X.

My point is, nobody who says Linux will be bad for you is making a definitive statement, 'cause I'm right here and Linux for me is working nicely. Here are a few screenshots taken with Shutter (a Linux Skitch replacement now that Evernote has destroyed the original). I find the dark theme much easier on my eyes.

Pithos on Debian

Mplayer and Youtube on Debian

I had to use -vo x11 to capture the Mplayer video, 'cause with the xv default it showed up as a transparent window.

JACK and Phasex on Debian

Openbox menu on Debian

Saturday, March 9, 2013

MintPPC 11 vs. Lubuntu 13.04 Shootout Deathmatch!

Not really. I told you earlier I installed MintPPC alongside Lubuntu on my Sawtooth, and since I wrote up a review of Lubuntu I thought I'd do the same for Mint. Minus the bloodletting.

Here's what you get with MintPPC: an easy install process, a good variety of low resource applications, and an LXDE desktop all set up and ready to go. Based on Debian Wheezy and Mint 11 (Katya), it's designed specifically for PowerPC Macs and is as painless to install as any distro. This being Linux, though, there are issues. This being Linux, though, there are also workarounds. I'll get to those in a minute, but first the positives.

Minitube is back! It's been long broken on Debian and was removed from the Wheezy repositories, but it's here and working flawlessly. Also, video performance in general is excellent. VLC and Gnome Mplayer work out of the box, and Gnome Mplayer in particular plays DVDs very smoothly. G3 users will need a specially compiled Mplayer and VLC available in this thread. Otherwise they'll crash without altivec. Or you can compile your own for the fun of it;)

MintPPC with PCManFM

As you can see from the screenshot above, MintPPC comes with PCManFM which also provides icons on the desktop. It automatically recognized my OS 9 and OS X partitions, but not my Lubuntu partition. For this I'll have to edit /etc/fstab. Performance is what you'd expect from an LXDE environment--fast. Plus the GUI is very sleek and minimal, more so than MintPPC 9.

About the GUI, though, there are some (fixable) problems. First, the now infamous invisible fonts problem is still here as of this writing, where black GTK fonts are invisible after installation. This is a Debian bug that is in the process of being fixed, but in the meantime I posted the workaround here. Also, the GTK2 theme breaks on GTK3 apps causing them to revert to the "default ugly" look. I guess MintPPC was put together in that awkward transition where GTK2 themes weren't yet updated to deal with GTK3 apps, but you can install the GTK2/GTK3 theme Mint-Z Improved, which is almost identical to Mint-X Metal (the default). The only hiccup was the task bar now displays the text white, but that's fixed by right clicking on the task bar, choosing "Task Bar (Window List) Settings" and checking the "Flat buttons" box. The two screenshots below show the GTK3 apps Gedit and Totem Movie Player, first under Mint-X Metal and the second with the compatible Mint-Z Improved.

MintPPC GTK2 theme

MintPPC GTK3 theme

If you want me to get really negative, I'll reserve that for "Software Manager." It's apparently designed for people who find Synaptic Package Manager too complicated, but if you've already installed Linux there is no way you will find Synaptic too complicated. Nevertheless, Software Manager is dumbed down to a toddler's level and also happens to be broken beyond belief. I would've liked to have seen it not included.

There are a couple of other default installs you'd do yourself a favor in switching out. Exaile is a music player that has been a massive fail for me on every system I've tried it on. Replacing it with Audacious would be a big upgrade. Also, XArchiver appears unmaintained and has a bug preventing it from unpacking .7z files. A good replacement is File-roller, though you'll probably want to install it with the --without-recommends option or it'll install a bunch of Gnome stuff with it.

A couple of other minor quibbles. No CD ripper? Am I the only one who still rips CDs? And an SSH server was not installed by default. If you're gonna have an SSH client by default, you might as well put the server software in, too.

I should also warn you about update-apt-xapian-index. It runs just after installation and, like Spotlight running for the first time, will drastically slow down your system especially if you don't have a lot of memory. You can look in this forum thread if you need to disable it. I just let it run and it finished after ten or fifteen minutes.

And one last note, Powerprefs, the pbbuttonsd configuration tool, must be run as root to save changes.

So what are you waiting for? Go grab an install CD and give it a whirl. There's a wealth of information in the MintPPC forums, just use the search, or ask a question if you can't find the answer.

UPDATE: I should add that my install came with pulseaudio, which can cause problems if you're trying to use a JACK audio server, among other things. So you might want to uninstall pulseaudio.

Thursday, February 28, 2013

Lubuntu 13.04 Raring Ringtail PowerPC Preview

I mentioned earlier I installed Lubuntu 13.04 and MintPPC on a second hard drive in my Sawtooth, so I thought I'd give you a quick look-see on the former to see what it's all about.

On first impression, it's highly polished. The theme is unified across all applications and the fonts are handsome. I'm not personally a fan of the Ubuntu font, but that just means 99% of the rest of the world looooooves it. The LXDE environment is easy to navigate around and very responsive, the same as LXDE on any other distro. It comes with a very minimal set of basic applications, which I appreciate. Just one music player (Audacious), one video player (Gnome Mplayer), one web browser (Firefox 19), etc. PCManFM automatically detected and mounted all partitions on both discs. Overall I was pleasantly surprised, though this being a development release there were some instances of bugginess.

First, I had to use the yaboot parameter "Linux video=radeonfb:1280x1024-32@60" entered at the second yaboot prompt. Otherwise I got distorted colors. Also, by using video=radeonfb:off, I could get 3D acceleration but only briefly. After a few minutes the system always froze, and it was due to radeon errors. I filed a bug report here and it's setting the world on fire as you can see.

Probably the biggest disappointment is with video. With 3D acceleration enabled, video playback is great, but like I said, 3D for me is unreliable. Back in a 2D desktop, videos show about 30% higher CPU usage and I get a slight horizontal shearing effect--slight but noticeable. I've never seen this problem on Debian/MintPPC. Also, when trying VLC it played sound but no video.

The only other bug I found was the Firefox blue tint bug, where some resized images are tinted blue. This is a PowerPC specific bug and has been patched at Mozilla's end, so it's only a matter of time before the fix migrates down to Ubuntu and Debian. In the meantime, Zen at PowerPC Liberation detailed a simple workaround here.

Here are a few screenshots, the third showing the Firefox bug:

Lubuntu 13.04 on powerpc 01

Lubuntu 13.04 on powerpc 02

Lubuntu 13.04 on powerpc 03

Go ahead, give Raring a spin. I recommend installing from the alternate CD instead of the live CD, because it fits on an actual CD and you don't have to worry about messing with yaboot parameters and xorg settings to get the graphical one to work. Actually I've had highly prejudicial experiences with live CDs in the past, so take that for what it's worth.

Some more useful reading here: Lubuntu 13.04 (Raring Ringtail) daily build

Monday, January 28, 2013

GarageBand Alternative for Linux

It's called LMMS (Linux MultiMedia Studio). Recently I decided to get more into learning about and making music. I'm always on the lookout for productive outlets for my OCDing and thought this could be the ticket. Also it has the added benefit of making me stop regretting that I couldn't play a note of music.

When looking for music production software on Linux, the first thing I became aware of is a lot of these programs require the JACK Audio server. So I installed it along with qjackctl (a settings GUI that also turns the daemon on and off) but got errors when I tried to start it. After a bit of googling, I found there are two separate JACKs, jackd1 and jackd2. jackd2 is not a sequel to jackd1. It's a different fork. So given I had jackd2 installed, I replaced it with jackd1 and...success! Got the server running, so now I can pass audio around between different applications if I ever need that function (moduler work environment is the applicable phrase). I don't know what the problem with jackd2 was. I got the same errors on an iBook and a Power Mac and the common advice about realtime settings didn't work. But for now I'm not gonna care.

Onto LMMS. This is probably your best bet as far as GarageBand alternatives go in that it's fairly easy to get started with but is also complex as hell just with the sheer number of options available to you. Here's the default setup with a triple oscillator synth selected:

LMMS screenshot

It has a song editor for writing melodies and a beat/baseline editor for writing repetitious things like...beats and baselines. You bring up a piano roll for composing notes, and it's pretty flexible as far as copying/pasting and moving things around, etc. It also comes with plenty of instrument presets and samples for you to mess around with. And the GUI's pretty slick.

I've only found a couple of problems. If your computer's too slow, playing back songs with too many simultaneous elements may result in distorted sound, so you'd have to export to wav or ogg to hear the whole thing at once. Also, I thought at first that LMMS required JACK and I couldn't get it to start up with a JACK server running. When I stopped the server LMMS started fine, and I found in the preferences it's set to use ALSA by default. Cool, but just to see, I switched it to use JACK and got the same failure to start up even with the JACK server turned off. I had to trash the .lmmsrc.xml file just to get it to launch again. Maybe the JACK problem will be an inconvenience down the road, but as is the theme of this post, for now I'm not gonna care.

Be sure to check out LMMS's online manual beginning with the Getting Started section.

As for other programs, there's also Rosegarden. When I installed it it wanted to install Latex as a recommended package for typesetting music notation, but since I wasn't in the mood for a 1 GB download and I don't need to produce fancy musical sheets I installed Rosegarden with the --without-recommends argument. It basically does the same thing as LMMS, but in different way, so it's a matter of taste. Rosegarden requires JACK.

Also requiring JACK is Hydrogen, which is like an LMMS for drum machines. There's also Superlooper, which is about making loops presumably super. And QTractor is a newer program people are talking about.

I also tried Ardour, but I couldn't get it to launch. Maybe it's a RAM issue as the iBook I tried it on only has 256 MB (UPDATE: It was a RAM issue. I upgraded to 640 MB and it started up fine.). And Jokosher failed at the Create New Project prompt. It sounds like this PowerPC bug is still there. Oh well, Jokosher. Your screenshots looked good, but you'll have to remain a mannequin in the window.

So now I'm in the market for a midi keyboard and having to answer the existential question that has ruined larger men than me: 49 or 61 keys?

Monday, October 15, 2012

Icons On Your Linux Desktop

Furthering my quest to get a more Mac-like interface on my desktop while still remaining (fairly) lightweight, I'm now going to tackle icons on the desktop. There are several ways to get this on an Openbox desktop. There's using Nautilus to draw the desktop, but Nautilus is slower than my preferred file manager, Thunar. There's also PCManFM for desktop icons, but PCManFM can crash occasionally and when it does it takes your entire desktop with it. So I poked around to see if there was a Thunar/XFCE way of doing it, and yes there is.

Full details are on this Crunchbang wiki, but the gist of it is to install xfdesktop4, though you launch it as xfdesktop without the 4. Then check your ~/.config/user-dirs.dirs file and make sure it points the desktop directory to your ~/Desktop folder like this:

XDG_DESKTOP_DIR="$HOME/Desktop"

Then after you launch, you get this. What do you think?

desktop icons on openbox

A few notes. First, the new desktop will take over the right and middle-click menus in Openbox, but xfdesktop's right-click menu includes an applications menu, and middle-click brings down a similar workspace menu. You can still access both Openbox menus by clicking on tint2 if you have that installed (check the above link for the configuration). Also, xfdesktop will display your wallpaper, so using Nitrogen or feh for that is redundant. To set the wallpaper, right click on the desktop, go to "Desktop Settings..." and click the "+" button to add your own wallpaper. And don't forget to comment out any wallpaper entries when adding xfdesktop & to your autostart file.

I don't know if this is a bug or a feature, but dragging a file from Thunar to the actual desktop will copy it, not move it. You have to drag it to the Desktop folder shortcut on the side pane to simply move it.

One last thing. Future versions of XFCE will supposedly have all this set up from within Thunar, so installing xfdesktop won't be necessary. Either way, I've found XFCE's desktop icons to be snappy and sleek. Now if I can only get a global menubar.

Sunday, October 14, 2012

An OS X-ish Dock for Linux

So say you want your Linux install to be a bit more familiar. Coming from OS X, you expect to see a dock. Taskbars are nice, but they're just so Windows-like, you know? Probably the simplest way to get a dock is to use lxpanel. You can configure it to look like a dock, and it's quick and easy. But I want to show you something a little more advanced. It's called Cairo-Dock, and it's loaded with features, including sub-docks, desklets, applets, and anything else you can think of.

cairo-dock on openbox

On first run, it'll ask you if you want it to launch in OpenGL. I'm not sure PowerPC users can use it in OpenGL given the state of graphics drivers, so I chose "no." This doesn't mean you can't have 3d effects. In fact, you don't need 3d acceleration running, either. You just need a composite manager like xcompmgr (see how to set up xcompmgr here). Otherwise, you may get a black box around it.

As you can see, there are applets in addition to simple launchers such as a clock, cpu meter, bandwidth monitor, desktop switcher, applications menu, and session management for logging out, sleeping, or shutting down. Memory usage is fairly light, and there are several settings available to lighten the cpu load. In fact, in the settings pane if you click the advanced button, you'll find so many options you'll get lost and never be found again.

I tried one other dock, called Docky, and it was okay, but it wasn't as feature-rich as Cairo-Dock and it was a little hard on my cpu. So Cairo-Dock comes out the winner.

EDIT: I forgot to add, to put it in your autostart file, use the command cairo-dock -c for the cairo backend and cairo-dock -o for the OpenGL backend. And make sure to end the line with an & if it's an Openbox autostart file.

EDIT II: As long as we're on the subject of things I forgot, I installed with sudo aptitude install cairo-dock-core and then sudo aptitude install cairo-dock-plug-ins --without-recommends. I did the --without-recommends part to keep it from installing a bunch of extra stuff I didn't want including the dreaded apt-xapian-index (a package indexer that isn't vital and will bring low end systems to a screeching, and I mean screeching, halt).

EDIT III: One more thing and I promise I'll go. Cairo-dock's plug-in package will install pulseaudio as a dependency. If pulseaudio gives you any problems, I wrote a little about it here.

Tuesday, October 9, 2012

Et Tu, LowEndMac? Et Tu?

I'm a bit late on this because I spend the bulk of my time proving my horrible time-management skills instead of checking my email, but I just saw the minor brouhaha that started when Zen at PowerPC Liberation put up an excellent post about Linux keeping PowerPC relevant. Well, LowEndMac responded with the following:
We love old Macs here at Low End Mac, and we've fiddled with BSD and Linux from time to time, but I take just the opposite perspective here. Windows is huge. Macs are big. Linux is small, maybe 2-3% of the desktop market, and most Linux software is compiled for x86 PCs, not old PowerPC Macs. Further, going from the Classic Mac OS or Mac OS X to Linux is a giant step backward in ease of use. Sure, it may be more secure, but we're Mac users because we love the Mac experience. Ditching the Mac OS for Linux is like taking a luxury car and replacing the automatic transmission because you want more control. I'd rather enjoy the smooth ride and the scenery than think about shifting gears, so even though I do have a Linux box here at Low End Mac headquarters, it's not a bastardized Mac. My 2¢.
And LowEndMac's Daniel Jansen added in Zen's comment section:
We're linking to your article in this week's Vintage Mac News, and while I wish you and other PPC Linux users the best, I think you're only creating an even smaller platform.
Ouch. I have to say, I'm vaguely insulted by all this talk about Linux not being user-friendly given my widely disseminated and universally acclaimed install guide that if followed faithfully and with a true heart will lead to the user-friendliness that Mac users crave.

If you saw my install guide posts earlier but not lately, I've spent the last several weeks revising and adding to them. I've added several sections to Part IV, including Gamma Settings, Trackpad, CPU Frequency Scaling, Fonts, Search, and GTK Themes. Also, I turned the Graphics Acceleration section into a short novel. If you're like me you can spend way too much time googling information for your own personal install guide, but feel free to crib off mine and hopefully it'll save you some time. ;)

In the meantime I, and I expect others, will keep writing about Linux because with OS X dead on PowerPC and increasingly restrictive toward developers on Intel, it's becoming less interesting these days.

And to prove me right, Zen is promising more posts about Lubuntu including an install guide.

Wednesday, October 3, 2012

Skitch Alternative for Linux

Welcome to another episode of How Do I Do That?, where you're using a piece of software in OS X, and you want to do the same thing in Linux and you ask, "How do I do that?" Today's title is a nifty screenshot tool called Shutter, an alternative to Skitch that enables you to not only take screenshots of desktops, windows, and menus, etc., but also annotate and edit them. Kind of like Skitch! Here's a screenshot of the main window:

Shutter main window

I gave it a picture within a picture effect just for kicks. And here's the editor window:

Shutter editor window

Okay, now I'm getting confused. You can see the basic editing tools on the side pane. You can also use several plug-ins for special effects like 3D effects, sepia tones, or making it look like a polaroid. And it comes with special upload tools for uploading via ftp or to Ubuntu One or to a number of other image hosters.

The only minuses I found were Imageshack uploading was broken in my Wheezy version, and jpeg compression was poor, leaving artifacts on annotations. So it's best to save in png format and use another viewer/editor to convert to jpeg if you must. CORRECTION: JPEG compression is the same in other programs. I must've been seeing things.

And I'm also informed that the Evernoting of Skitch is nearly complete as Evernote is eliminating all old Skitch sharing accounts and making users migrate to Evernote to take advantage of syncing! and searching! but apparently no direct links. Users have until October 10th to download their old images. Thanks, whoever sold Skitch to Evernote.