Desktop Icons
Let's start with desktop icons. Rox has a Pinboard function that allows it to draw the desktop background and enable dragging and dropping icons onto it. It's not quite like other file managers where you drag and drop and the files get moved to the Desktop folder. Instead, dragging and dropping creates an iconified link on your desktop. The actual file remains in its original location.
So first you go into Rox's preferences by right-clicking on a Rox window and selecting "Options." Then click the "Desktop" section and make sure "Pinboard only" or "Panel and Pinboard" is selected (the Rox panel is somewhat gauche and ugly so I won't use it here). Next, in a terminal enter "rox --pinboard=MyPinboard" ("rox --pinboard=" with nothing after the equal sign conversely kills it). Here your desktop should turn a dull grey, because Rox is now painting your desktop. To get back your wallpaper, right-click on the desktop and choose "Backdrop..." and drag and drop your wallpaper file to the popup window. If you're wondering where your Openbox menu went, don't be alarmed. Go back into Rox's preferences, and in the "Compatibility" section click "Pass all backdrop mouse clicks to window manager." This gives you your Openbox menu back.
So now that you have it all set up, you can drag files (and applications) to your desktop. These are launchable icons that are right-clickable to bring down extra options, including removal. There are other options in the preferences for fine-tuning including choosing your icon theme, so make use. Once you're satisfied, you can put the command "rox --pinboard=MyPinboard" in your autostart file (don't forget the "&" at the end if it's an Openbox autostart file).
Mounting Drives
Now let's move on to mounting external media. It's easy for optical discs. You just open the mount point in Rox (/media/cdrom0 on Debian) and it automatically mounts. You can set the mount point as a Rox bookmark or add a pipe menu in your Openbox menu (more on that below) for shortcuts.
(EDIT: Thanks to a tip in comments, you can automount any external media with udisks-glue. The steps are: install udisks-glue, then add "udisks-glue &" without quotes to ~/.config/openbox/autostart, and that's it! When you login again, your external drives will automount in /media. So with that you can probably disregard the next four paragraphs until you get to the pipe menus section. And on the subject of pipe menus and udisks-glue, take a look at obdevicemenu.)
First, create a mount point in /mnt with
sudo mkdir /mnt/name of your drive. Next, you want to get the UUID (universally unique identifier) of the device by plugging it in and entering in a terminal sudo blkid /dev/sdb1. Or it may be sdc1 if you have two internal drives taking up sda and sdb. You'll know when you plug in the device with your /dev directory open. Just see what gets added, sdb1 or sdc1, whichever. The "1" at the end refers to the first partition, so if you're attaching, say, a Mac in Target Disk Mode, you'll likely enter sdb3 because OS X system partitions are usually the third on a disk.Once the blkid command reveals your UUID (and your file system under "TYPE"), create a new line in /etc/fstab that looks something like this (all on one line):
UUID=5956-17FF /mnt/FLASH_DRIVE vfat user,noauto,noatime,nofail,rw,flush 0 0That's for my thumb drive. The "vfat" is its file system, the flush option is specifically for vfat file systems, and the nofail prevents failure messages at boot when the drive might not be attached. For non-thumb drives you may want user,noauto,noatime,nofail,rw,defaults.
Now to mount when you attach it, just open the mount point for that specific drive in Rox and it mounts. Unmounting should work by closing the folder and getting a dialog, but if it doesn't you can right-click on the folder and choose the unmount or eject options. And you can create bookmarks of your mount points for shortcuts, too.
Pipe Menus
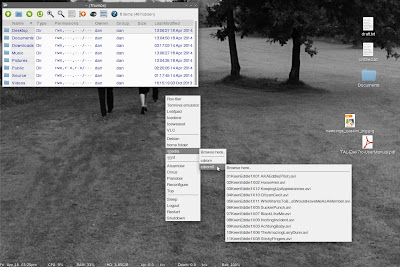
I mentioned earlier you can add shortcuts in your Openbox menu in the form of pipe menus. With pipe menus, you can browse the contents of your home folder from right inside your Openbox menu and launch files or choose a folder to open in Rox. You can also open mount points to mount devices.
This involves getting a script file and adding entries to Openbox's menu.xml that call the script and create the pipe menus. So first go to this Archbang wiki page and copy and paste the contents of the script into a new file. You just need to make one change. Where it says "spacefm", change it to "rox-filer" or whatever your file manager is. Save it as obpipemenu-places and make it executable with sudo chmod a+x.
Next, add the correct entries to ~/.config/openbox/menu.xml, placing the entries in the file where you want them to appear in the menu. Mine look like this:
<menu execute="/home/dan/Source/scripts/obpipemenu-places" id="browse" label="home folder"/>


<menu execute="/home/dan/Source/scripts/obpipemenu-places /media" id="browse2" label="media"/>


<menu execute="/home/dan/Source/scripts/obpipemenu-places /mnt" id="browse3" label="mnt"/>
Save the file, then choose Reconfigure from your Openbox menu (or
openbox --reconfigure from the terminal) and you should see something like this:
One more note on integration, Roxterm has a lot of drag and drop compatibility with Rox-filer, similar to the Finder and Terminal.app in OS X.
Bugs/Workarounds
You didn't think all this would be bug-free, did you? There are a couple of conflicts with Conky I can point out. First, right-clicking the desktop may cause your Conky output to blink. Since this is annoying, you can stop it by going into the "Compatibility" section in the preferences and select "Override window manager control of the pinboard and panels." Also, Conky transparency doesn't play well with Rox's pinboard. It'll show a black background on your Conky window. This might not be apparent at first if you have your previous wallpaper program running, but when you kill it and just have Rox drawing your desktop, you'll see it. The solution is to have both wallpaper programs running simultaneously, oddly enough. I use feh, which is low resource, anyway.
I also found a window focus bug. When I open a Rox window with the Pinboard running, the first click on the window unfocuses it, or if I first right-click on it, it brings down the Openbox menu as if I were clicking on the desktop. This is also annoying. To fix it, go into Rox's preferences, in the "Compatibility" section, and deselect "Pass all backdrop mouse clicks to window manager." But now you can't bring down your Openbox menu, right? Well, you can do it with a keybinding. I actually prefer this instead of hunting for an open space on the desktop to right-click on. Rather, you just hit a key combo wherever your cursor happens to be. To set a keybinding, edit your ~/.config/openbox/rc.xml by inserting the following into the <keyboard> section where all the keybindings are:
<keybind key="W-KP_Enter">
  <action name="ShowMenu"><menu>root-menu</menu></action>
</keybind>
The "W" in "W-KP_Enter" refers to the Windows key (Apple key on Apple keyboards) and "KP_Enter" is the Enter key (on the bottom row on laptops, or on the keypad on extended keyboards). Or you can delete the "W-" part and just have the keybinding be Enter. Looking at the other keybindings, you'll see that "S" refers to Shift, "C" is Control, and "A" is Alt. You can look up the other keys with the xev command, such as the spacebar being "space".
Finally, files and folders with ampersands, apostrophes, and possibly quotes, in their names will fail to open in the above pipe menu, so you can just modify the names (yes, I found out when my Guns N' Roses folder failed to open).
I think that about covers it. Oh, wait, I forgot setting up default applications. That can be done with the "Set Run Action..." menu item when right-clicking on a file. Drag and drop your chosen application's .desktop file from /usr/share/applications into the popup window, and you're all set.
You can also add an "Open With..." function, only in Rox it's called "Send To..." To add applications to your "Send To..." menu, right-click a file, select "Send To..." and then "Customize" and it'll open a folder at ~/.config/rox.sourceforge.net/SendTo to drag and drop symlinks from /usr/share/applications into. To drop a symlink, choose "Link (relative)" from the resulting menu. You can also divide the applications by file type by adding hidden folders like .text, .image, and .video into the SendTo folder and dragging the proper symlinks into their respective folders. You should rename the symlinks to get rid of the ".desktop" at the end. Now you should see a menu of applications popup when you click on "Send To..." :-)))
You're still here? Go. Go home.


